Review of reverse engineering (i.e. software reversing) tools. Advantages and disadvantages, alternative solutions.
Reverse engineering or software reversing, is a set of techniques use to analyze closed source software in order to extract seemingly unavailable information, e.g. algorithms, hidden access passwords (e.g. to databases), information on how certain files are encrypted, and so on.
Reverse engineering is used for example in the fields of software analysis for potential security vulnerabilites (exploitation), malware analysis (antivirus developers) or software and games localization.
Advanced software analysis requires the knowledge of examined files structure, so most often a knowledge of executable files formats is required, Portable Executablefor Windows system or ELF format for Linux type systems. It is also required to know basis of assembler for 32 and 64 bit platforms, in order to understand properly compiled code in closed-source software, its structure and widely used conceptions and software constructions transformed into binary data.
Even having appropriate knowledge we will not be able to use it without proper tools. In this article I'd like to present dedicated tools, used in reverse engineering, divided into categories. Majority of dedicated tool, divided into categories, that are presented here, qualify as a material for separate article, however it was my idea to present as many types of software as possible, to show a variety of uses.
Complicated character of reverse engineering software as well as the process of its creation is often connected with the fact that those programs are also expensive, but I tried to present alternative solutions and free equivalents of presented examples.
Identifiers
There is a wide variety of both programming languages and compilers. Apart from applications created in script languages, we can differentiate applications compiled to processor's native code. Apart from that there is a number of methods of protecting applications and their resources and all of that affects the final result of binary file image on disk.
If we are not sure what the software that we are looking at was created with, as we have no expertise in distinguishing characteristic features in compiled files (section names, imported libraries, etc.), using identification (or detectors), tools that have signature base of popular compilers, program and cryptographic libraries or application security systems, is worth trying. Quick analysis will let us decide what our next step should be (e.g. unpacking the application)
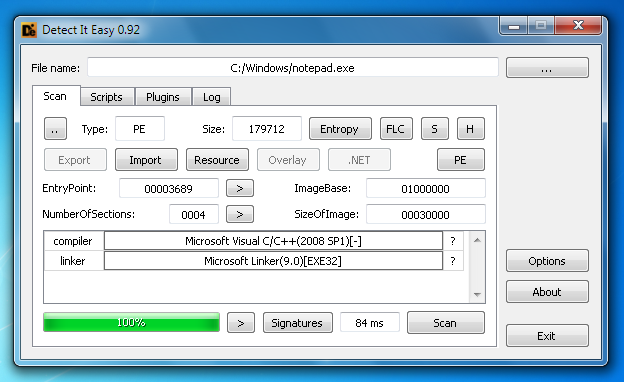
Detect It Easy
DIE detector has a database of most popular security systems, including exe-packers, exe-protectors as well as signatures of popular compilers and linkers. Additionally it has a simple built-in script language, that allows us to add new signature definitions quickly. A PE executable file structure viewer is also available.
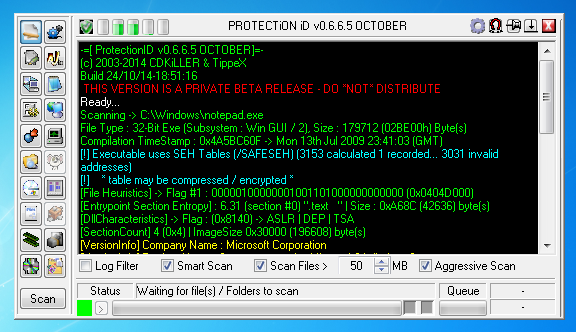
Detector ProtectionID was created to detect games security systems, it has a vast base of signatures from all possible security systems, compilers and linkers. Despite the fact that user interface my not be the best looking, it does the job perfectly and is updated very often.
With knowledge about what we are dealing with or, to be precise, what programming language and compiler this application was created with, we begin analysis in disassembler or decompiler. It is their task to analyze compiled, binary file and display its code and structure in a way easy for a human to understand.
Thanks to the process of disassembling and decompiling we will know all the functions of application, what text strings are inside and what fragments of code references to them, what outside functions of operating system are used by application or which functions are exported (e.g. in the case of DLL dynamic libraries).
Disassemblers job is to depict application's code in the for of low-level assembler, so if analyzed software was written in C++, Delphi, Visual Basic or any other high level language compiled to native code, disassembler will show us its object code in the form of x86 or x64 assembler code.
Decompilers are able or try really hard to recreate original high level code from the code of compiled applications. As you can guess, recreating a high level language code, e.g. C++ with recognition of data structures, types and construction of programming language from compiled code of assembler is a very complicated process, so the amount of tools that allow such action is very small and if they are good, they are in the same time very expensive.
Decompilers can be divided basing on categories of software that they are able to analyze. Compilers of languages like e.g. C# (.NET Framework family), Visual Basic, Java generate object code in the intermediate form, meaning that this code is not directly executed by processor like x86 code, it is a pseudo code (so called P-Code), that is executed by a virtual machine of those programming systems (to run we need e.g. .NET Framework or JVM installed).
Such output code, because of its simplicity and most information stored in the form of pseudo instructions and metadata, resulted in the fact that decompiling in such cases is much more simple than decompiling x86 or x64 code. This caused creation of many dedicated decompilers, that became a nightmare of programmers writing in those languages, as it was very easy for anyone to take a peek at unprotected software, practically it's the version with source code wide open.
That was short introduction, now it is time for a list of most popular disassemblers and decompilers and their usage examples.
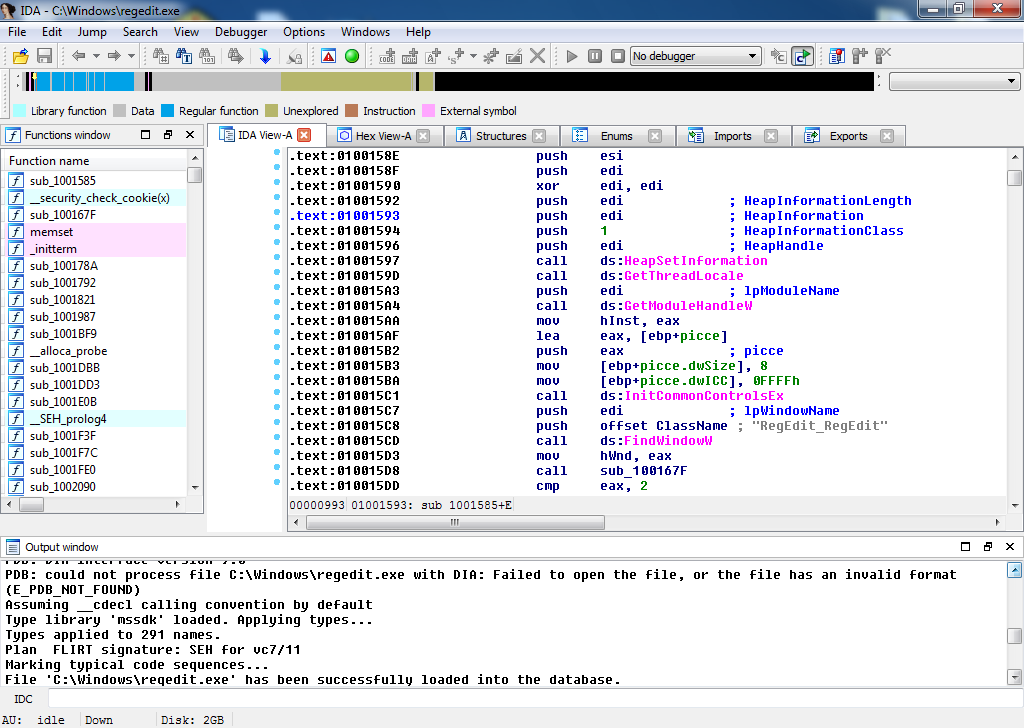
IDA and Hex-Rays
IDA that is Interactive DisAssembler in an undpisupted king among tools used in reverse engineering. IDA is a disassembler and debugger with built-in code analysis for over 60 types of processors. It has its own script language, large base of signatures of the most popular programming libraries as well as support for plug-ins that additionally enhance functionality e.g. by support for Python scripts.
Image 3.IDA's disassembler and decompiler's window
The most known and valued plugin for IDA is Hex-Rays decompiler, that supports decompilation of x86, x64 and ARM codes, which is invaluable analysis tool.
IDA also has built-in debuggers for many hardware platforms, which makes this a perfect multitool for analysis of various executable files.
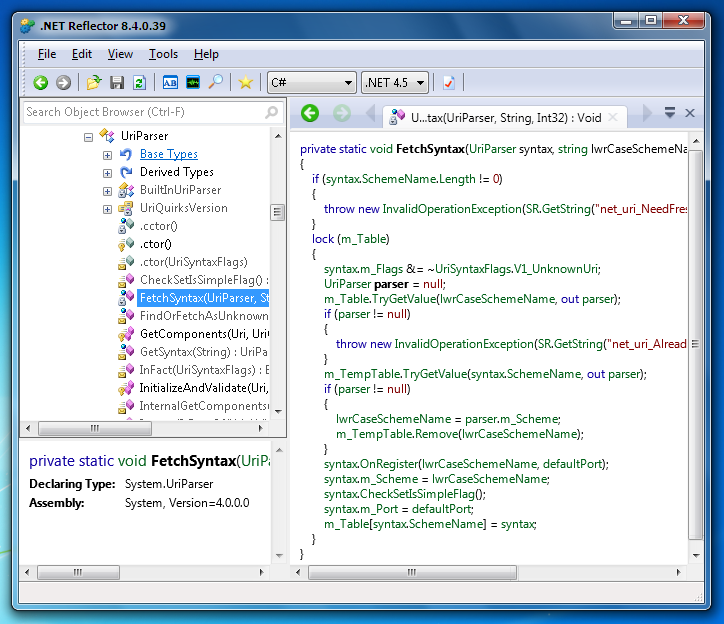
When you must face analysis of software created in programming language based on .NET Framework, e.g. C# or VB#, .NET Reflector decompiler will prove invaluable help. With its help you will be able to quickly and efficiently take a peek at application's structure and code.
Reflector's big advantage is the fact that it has a small, but very useful plugin base, with available for example a plugin that allows recreating of whole project for Visual Studio, from decompiled application. In addition, integration with Microsoft Visual Studio allows for simultaneous debugging of own code and code of closed libraries.
Because of simplicity of decompiling programs created for .NET Framework, many security tools were created, of course we are talking here about obfuscators that remove meta data from compiled programs, are able to modify IL code, encrypt text strings etc. If we come across such a program, we should familiarize ourselves with de4dot deobfuscator, that is able to automatically remove protections used by dozens of obfuscator types.
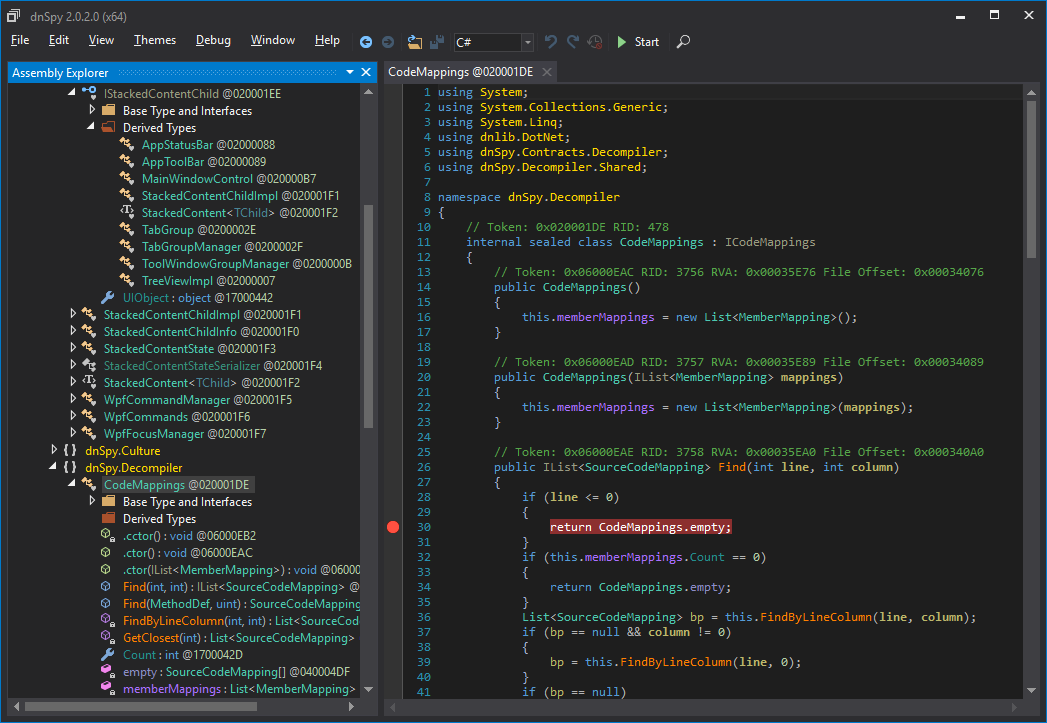
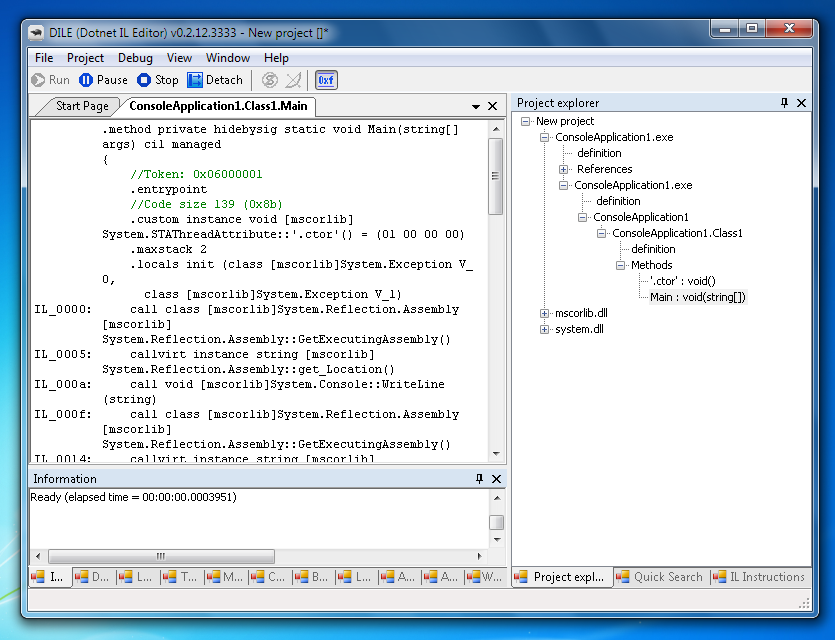
A real workhorse for .NET decompilation, with built-in IL code editor and debugger. Above all of that, it's free with intuitive and modern interface design.
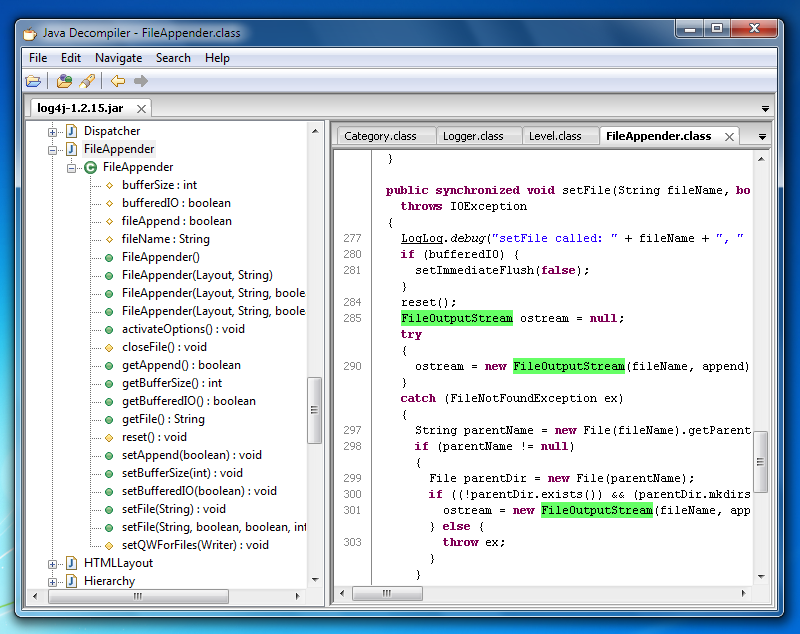
JD-GUI or Java Decompiler is a decompiler for Java applications, hence its name. It allows for viewing of compiled units code*.class or whole *.jar bundles.
It contains very useful search engine with filters that allow for searching by names, types, constructors, fields, methods and text strings.
Apart from stand alone application there are also plugins for programming environment Eclipse and IntelliJ IDEA, that allow for viewing code of compiled modules.
If you've ever used or you keep using well-known decompiler JAD (that was discontinued in 2001) then it's about time for an update, not only does JD-GUIsupport new elements of Java language, but also navigation over decompiled project is very easy and fun.
It also needs to be mentioned that, just like with .NET applications, that have been protected with obfuscators, Java applications can be protected and then decompiler functioning is limited or even impossible.
No support for protected application (no deobfuscator)
No disassembly to IL in case of finding errors
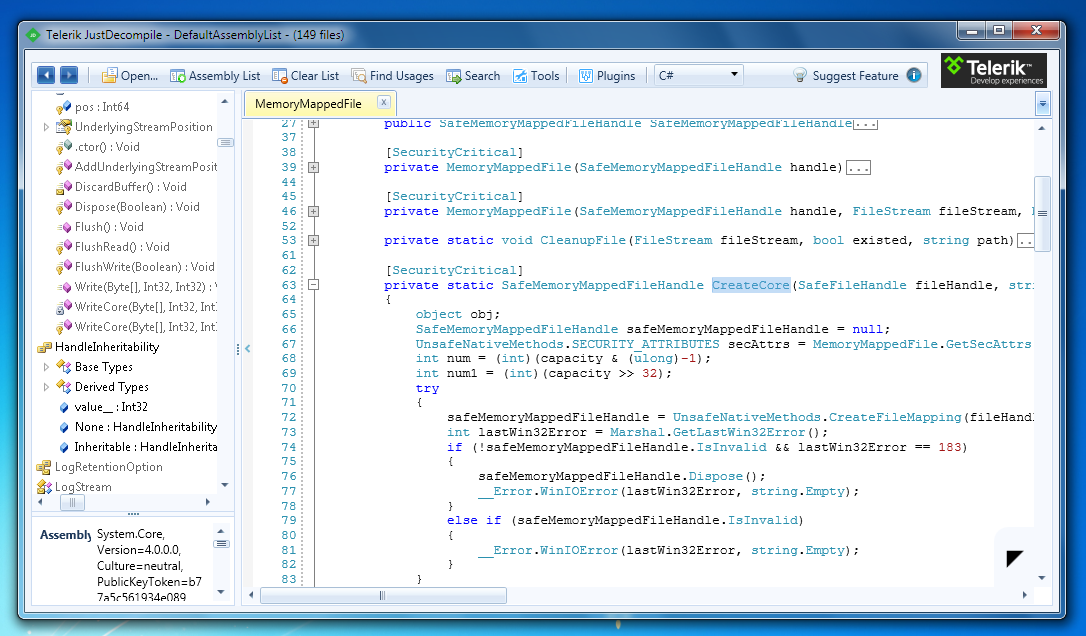
JustDecompile
Free alternative for commercial.NET Reflector developed by Telerik known for UIcomponents. Free doesn't mean worse, it has built-in reference search engine, generating projects from decompiled sources ability as well as support for plugins, including de4dot deobfuscator plugin.
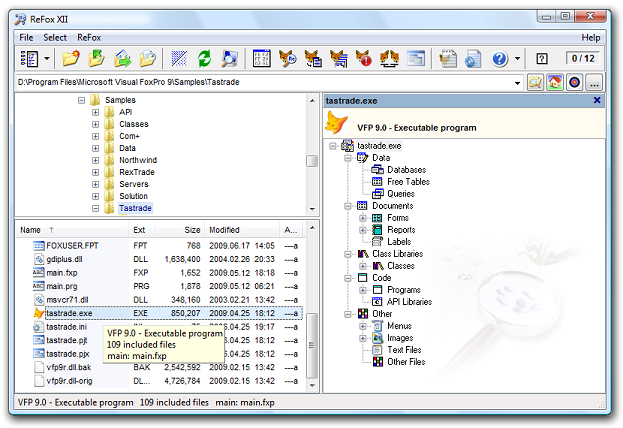
Decompiler for applications created with database programming environmentVisual FoxPro from Microsoft. This is a very niche solution for equally niche environment, but there are no alternative solutions that would allow for analysis of those application and those that do exist have been discontinued and don't support latest versions of VFP applications. ReFox allows for decompiling of classes, viewing forms and built-in data.
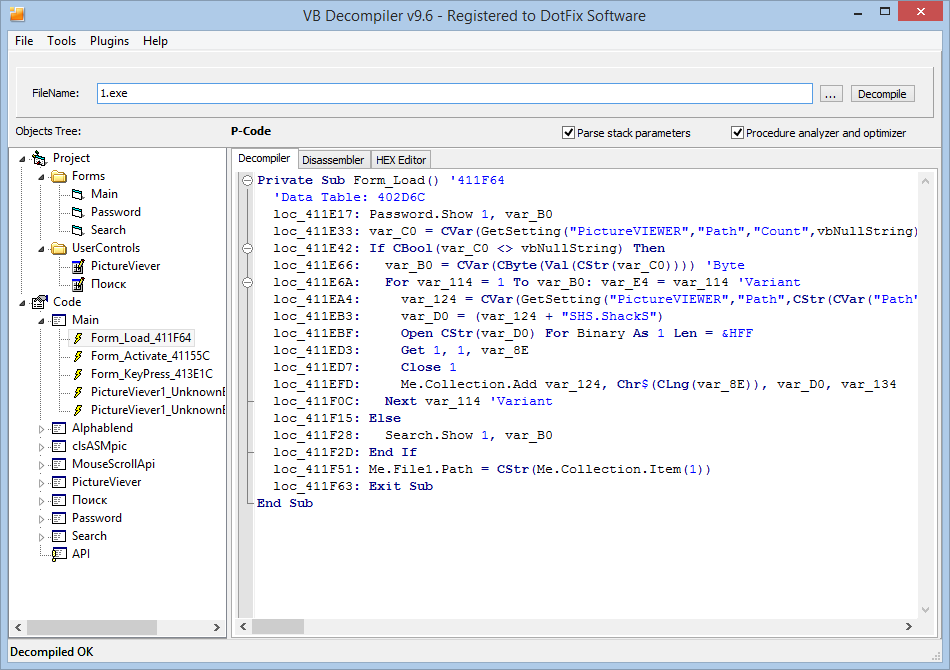
Applications created with Visual Basic 5 and 6 are all in the past now, however internal structure of code based on P-Code was a cradle for .NET technology and from the very beginning it's been causing problems with code analyze, as there were no dedicated tool for its analyze. We can say that VB Decompiler was created a bit too late for the market's needs, but is irreplaceable when analyzing Visual Basic applications (EXE, DLL as well as OCX controls) compiled to P-Code (Visual Basic also allowed from compiling to x86 code).
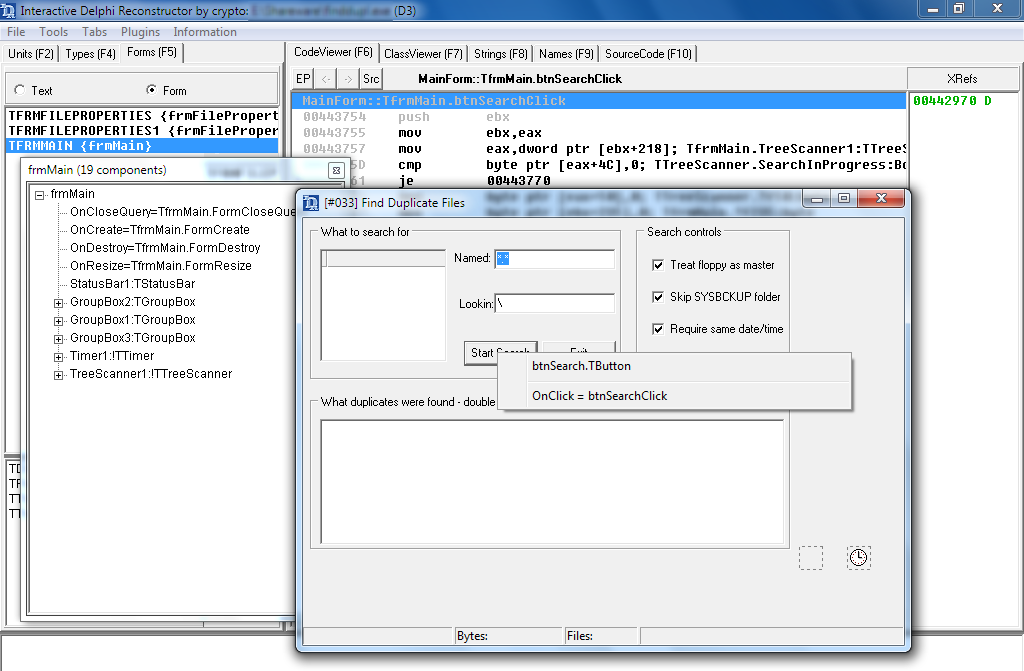
Disassembler and decompiler IDR or Interactive Delphi Reconstructor is a tool meant only for application analysis in popular Delphi environment. It is a very useful tool comparing to e.g. IDA because it can analyze internal structures of Delphi application, has built-in form viewer, that allows for fast and easy finding of events assigned to controls on the form (e.g. button1.OnClick). IDR has vast databases of signatures of standard Delphi environment libraries in all available versions, so in output deadlisting we will see friendly function names.
Image 9.Disassembler and decompiler for Delphi - IDR
Freeware with optional paid current copy (unknown terms and conditions, author couldn't be contacted).
Advantages
Delphi form viewer with controls events browser
Export of map with names of functions and variables (e.g. forIDA or debugger)
Built-in signatures of all versions of Delphi environment
Disadvantages
Irregular updates
Unclear terms of access to latest versions
Debuggers
Every programmer sooner or later gets to know the functioning of a debugger in his favourite programming environment. Thanks to debugger we are able to track application running in real time, see how instructions affect contents of memory or variables and detect potential errors. However debugging of our own software, when we have access to information about source code and usually debug high-level code, straight from programming environment, is a piece of cake compared to debugging of application without access to source code. This is where dedicated debuggers, with advanced analysis of binary application structures, come in handy, but their use requires knowledge of low-level languages as well as basis of functioning of processor, for which this application was compiled.
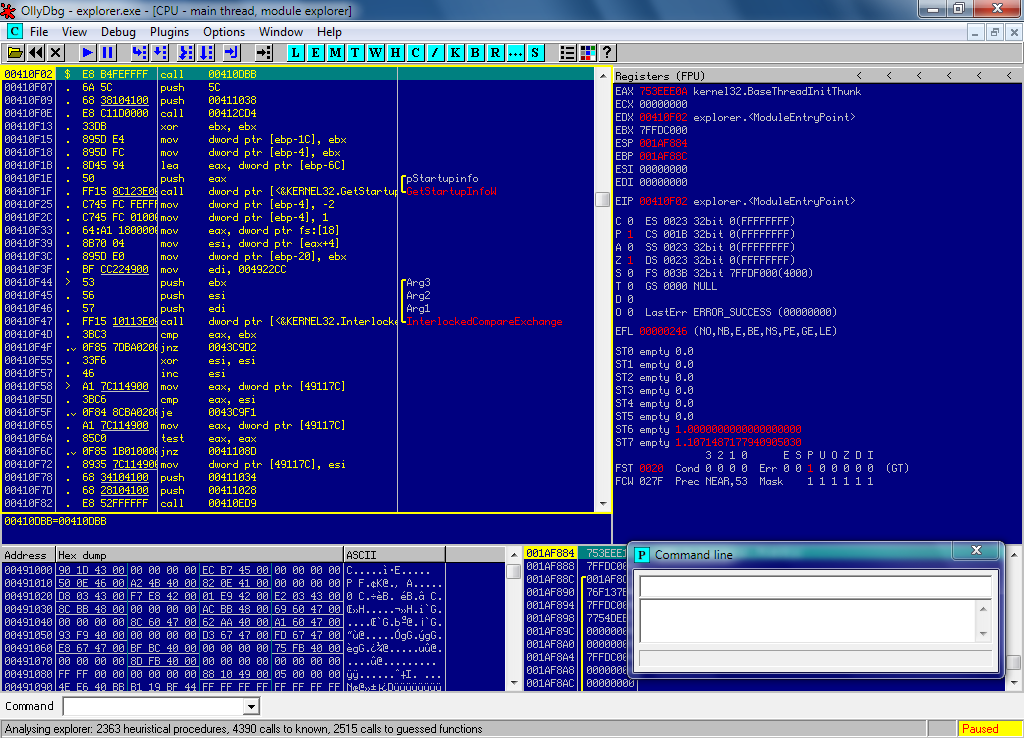
OllyDbg
This is de facto a standard debugger for Windows in the world of reverse engineering (alongside built-in debugger for IDA disassembler). It has capabilities of application code analysis and allows for interference with almost every aspect of application running.
Other interesting functions include OllyDbg that allows for conditional code tracing, has vast plugins database, including those hiding its presence from anti-debug methods (Phant0m plugin), or plugins that allow for controlling of debugger running from the script level (ODbgScript plugin), while those scripts, most often used for unpacking of unprotected applications, come in hundreds.
Popularity of OllyDbg is obvious with the fact, that no other debugger, including legendary SoftICE system debugger has had so many plugins and modified versions like OllyDbg. It is interesting that a special version OllyDbg was created under the name of Immunity Debugger with built-in Python script support, meant for analyzing malware and creating exploits
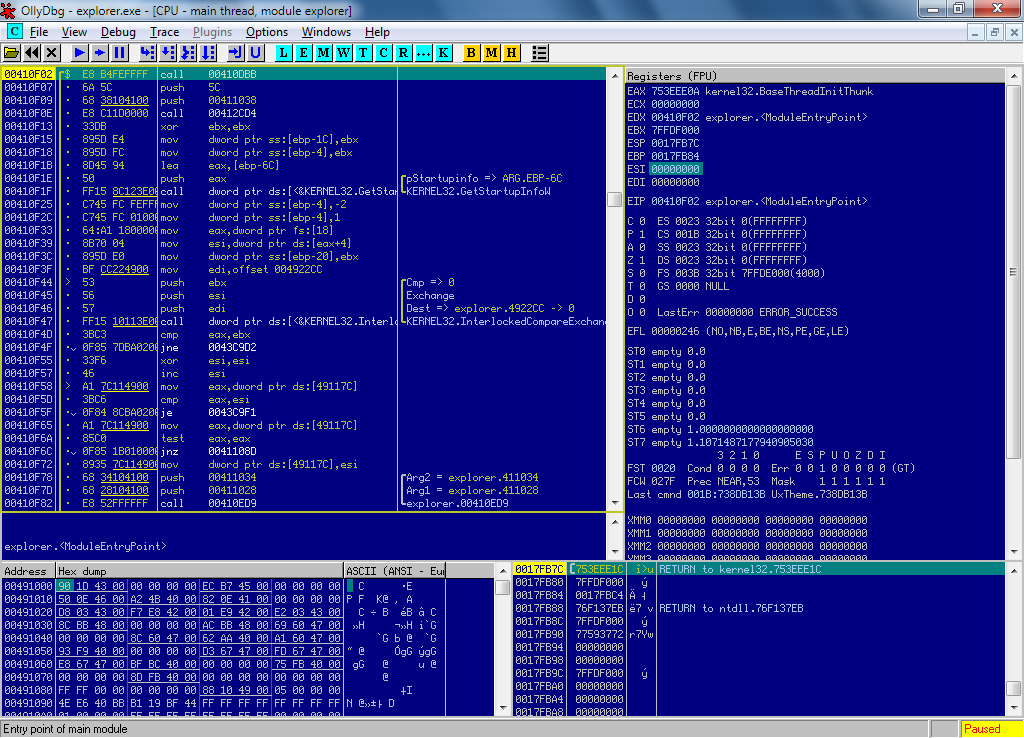
There are currently two versions of OllyDbg, old with number 1.10, that has the most extensions and new version 2.01 that is becoming more and more popular. It is good news that a new 64-bit version is being developed because of popularity of 64-bit operating systems.
Image 10.OllyDbg v1.10 DebuggerImage 11.The same code in OllyDbg 2.01 debugger
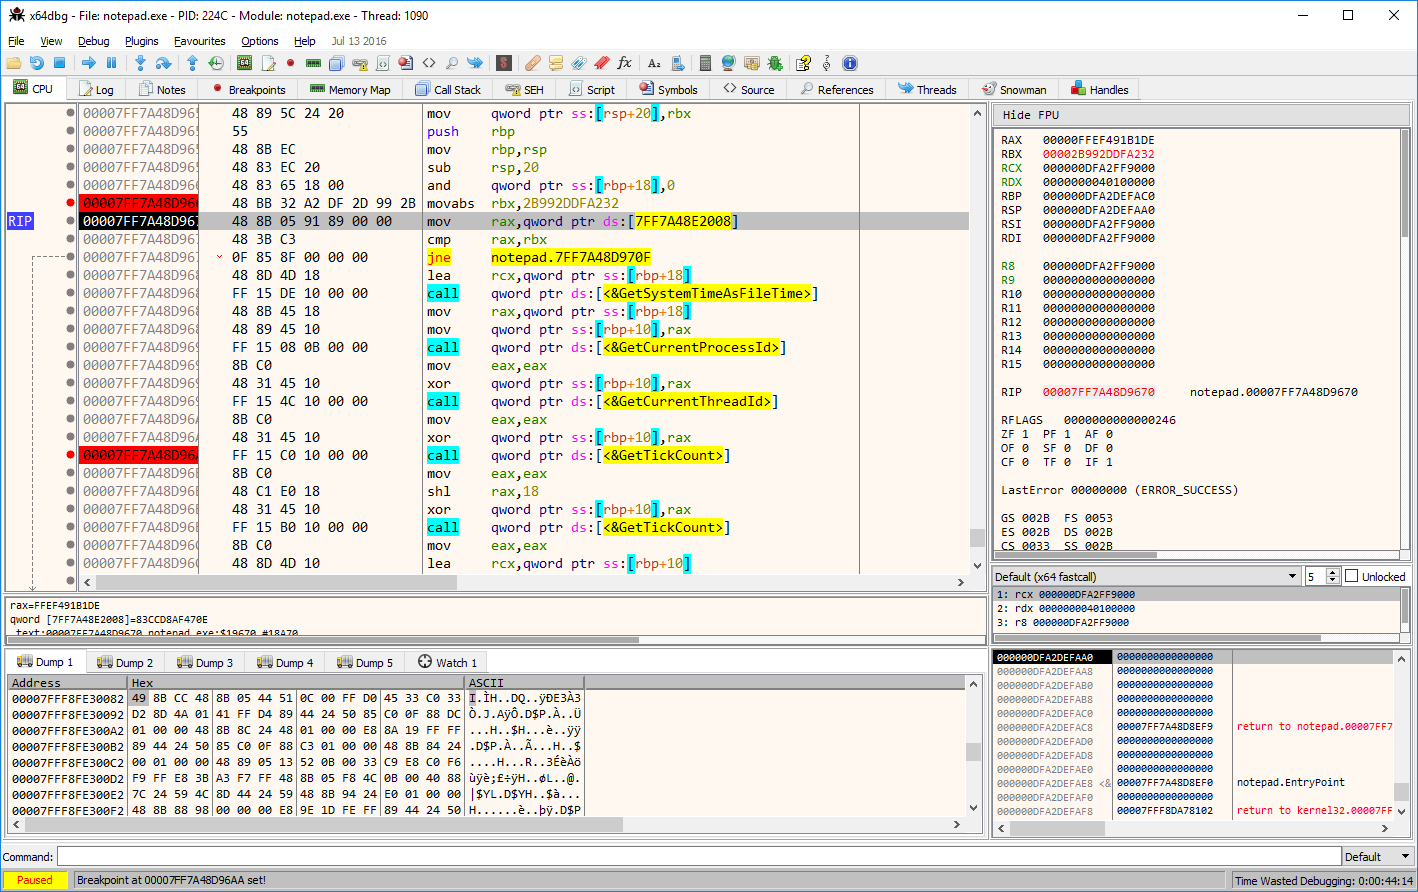
x64dbg are basically two debuggers, one dedicated for 64 bit software debugging and second for 32 bit applications. It features modern interface, plenty of configuration options, internal engine based on modern programming libraries likeTitanEngine, Capstone Engine, Keystone Engine.
Number of supported features is really impressing, plugins, built-in scripting language, Yara signatures scanning, built-in decompiler and many more. And it's development is very active. Taking the fact that 64 bit OllyDbg never left the development stage, x64dbg has become de facto standard debugger for 64 bit applications.
Debugger for .NET Framework applications. It is quite a robust tool, but sometimes invaluable. It looks a bit like Visual Studio built-in debugger, I'm mentioning it only because it is one of very few debuggers for .NET applications without access to source codes, there are also plugins for .NET Reflector for the purpose of debugging (Deblector plugin).
If you have analyzed your application in disassembler, traced its running in debugger, there may be a need to interfere with program code in order to input corrections or to change some text strings, fix values or other information included in application's binary file.
For that purpose hex editors are used. At times when I used to read games magazine Top Secret, I associated hex editors only with save games modification, as readers were sending numerous offsets (addresses in a file) as well as values that needed to be changed in save files, e.g. to get certain amount of cash or other resources in the game.
There are many hex editors on the market, with numerous different functions and applications, like e.g. built-in view over data structure (meaning that this hex editor is able to visually display for example bitmap elements or internal structure of exe file). An example of such an editor is e.g. well known WinHex, that is used in data retrieval (it contains built-in support for many system files), however in my opinion it is not very good for works connected with 'digging' in application's binary files, despite the fact that it has appropriate functions.
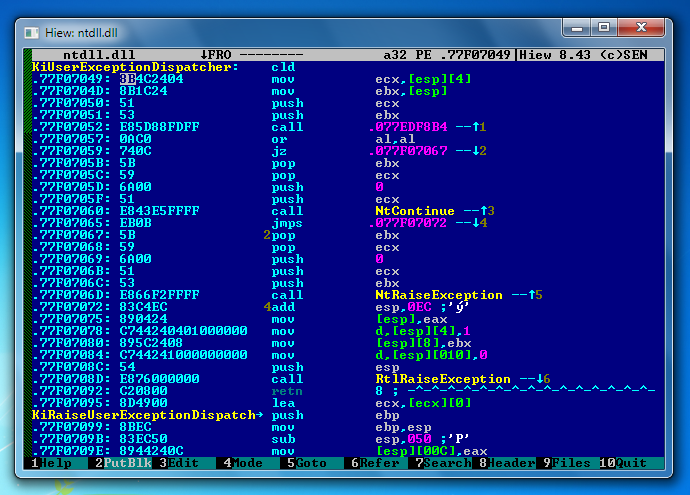
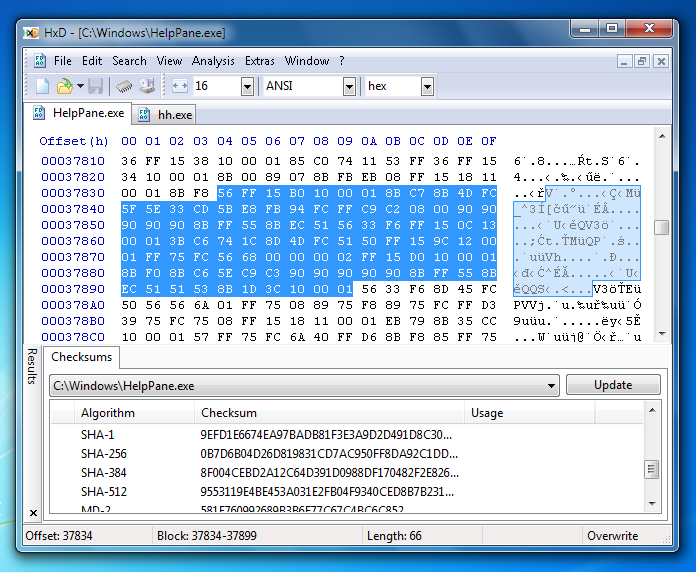
HIEW
This is my number one for hex editors, I cannot imagine my work without it. It is seemingly an old console application, but in reality it is a true beast. HIEW (byHacker’s View) is a hexeditor, disassembler that supports architecture of x86, x64, ARM V6 processors, it also supports NE, LE, PE/PE32+, ELF/ELF64 files. This program has vast user database has been developed since 1991 and updates are regular.
Thanks to HIEW we are able not only to edit binary file data, but if that is an application, also its code. Built-in disassembler allows for navigation over the code and its functions as well as to easily modify existing instructions with the help of built-in assembler, which means that you don't have to know hex codes by heart, instead it is enough to write e.g. mov eax,edx and HIEW will automatically compile that instruction and insert it into binary file.
HIEW is also able to repeatedly replace tools like IDA, if we have a simple task to do, its greatest advantages are its ability to operate very fast and built-in code analysis and direct modification options.
Windows hex editor with many useful options, file comparison, bit operations on code blocks, generating checksums, contains structure view for the most popular types of files.
Free hex editor with basic functions and options like edition, search, file comparison. It allows for simultaneous work with multiple files, it is also possible to open memory of different processes and to gain direct access to discs.
Characteristic feature of Windows applications is the fact all resources like icons, images, forms, localized texts, as well as other information, can be saved in PE file structure, within special area called resources. Those data are saved when linking. As all application files are saved in one EXE or DLL output file, if there is a need to change those information and if their size is unchanged, we will be able to modify them using hex editor, however if we need to add new data or set different that have larger size (e.g. longer text or another image), because of structure of those data we will have to use proper resource editor.
Apart from modifications in application's resources, resource editors are also used just for taking a peek what additional data are stored in application's file.
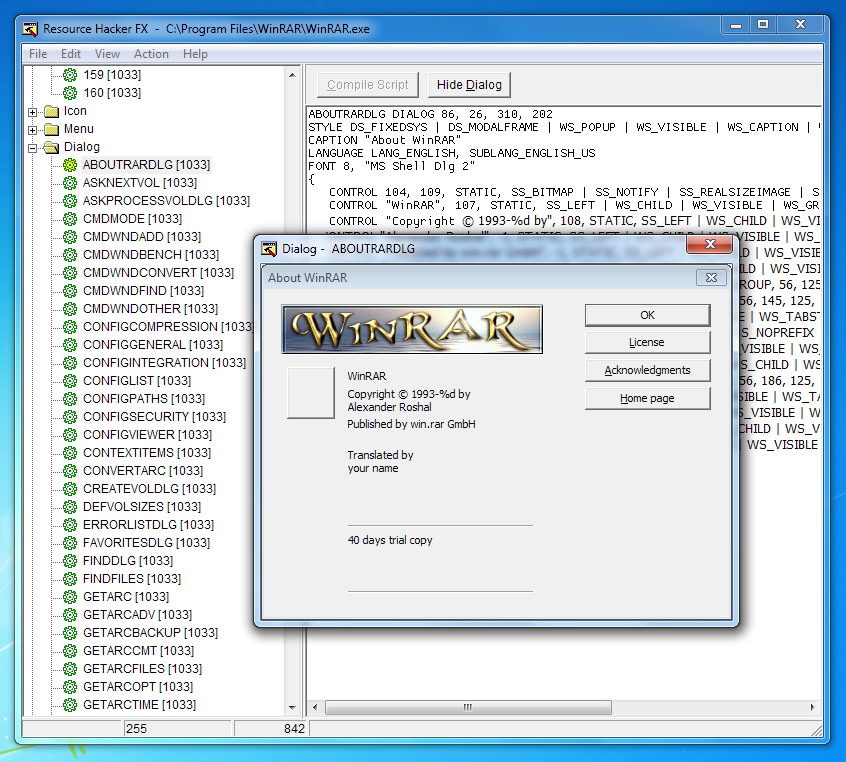
Resource Hacker FX
Resource Hacker used to be one of the most popular resource editor, but it has been discontinued for a long time, despite that fact of its popularity, new patches have been created that gave this editor a new life.
Excellent resource editor from the creators of PE Explorer. It contains built-in unpackers, e.g. for UPX or FSG compressor, resource edition can be also done with use of friendly wizards. Resource Tuner has also built-in scanner that allows for scanning of any given catalogue for resources of a specific type.
Reverse engineering requires specialized tools for specific purposes, other than standard ones like disassemblers, decompilers and debuggers – there are many dedicated tools that help in analysis of applications as well as editors, some of them you will find below.
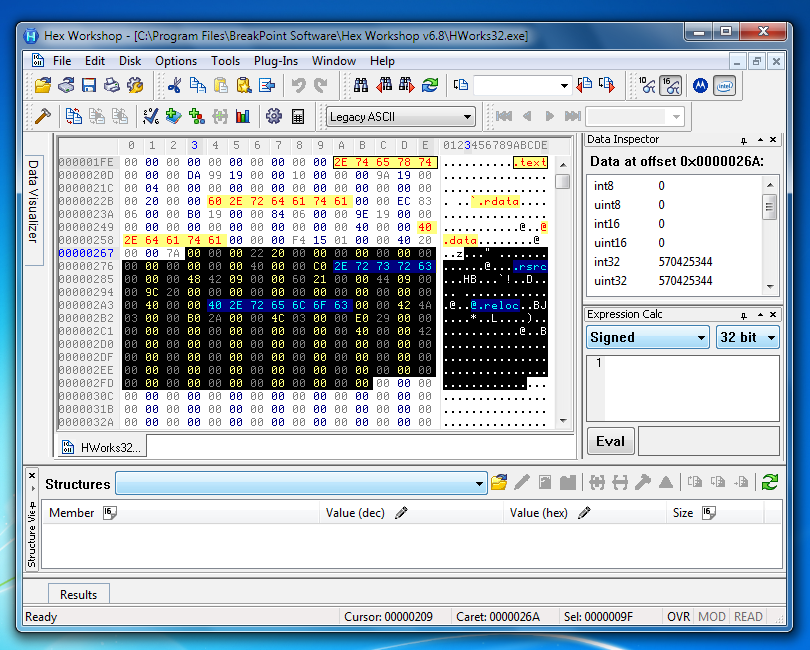
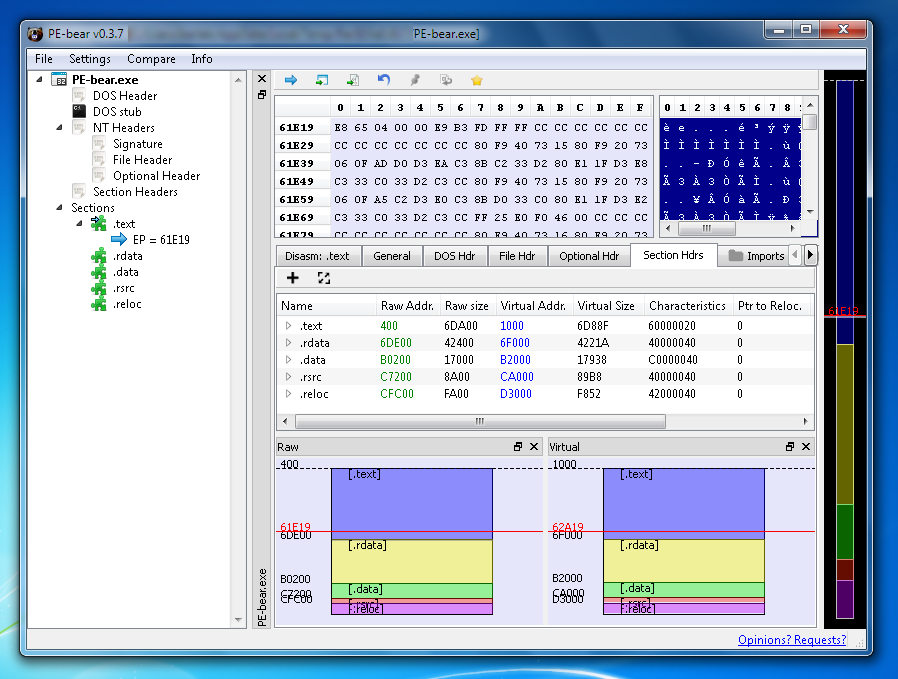
PE-Bear
Excellent browser and file structure editor, with built-in simple disassembler, PE file compare basing on values from all structures (solution that is unique on a world scale), detection of popular exe-packers / exe-protectors, hex editor and graphic visualization of section structure.
Tool created by a Polish programmer (yes, you got it right) is perfect for low-level analysis of PE/PE32+ files, created mostly for the purpose of malware analysis.
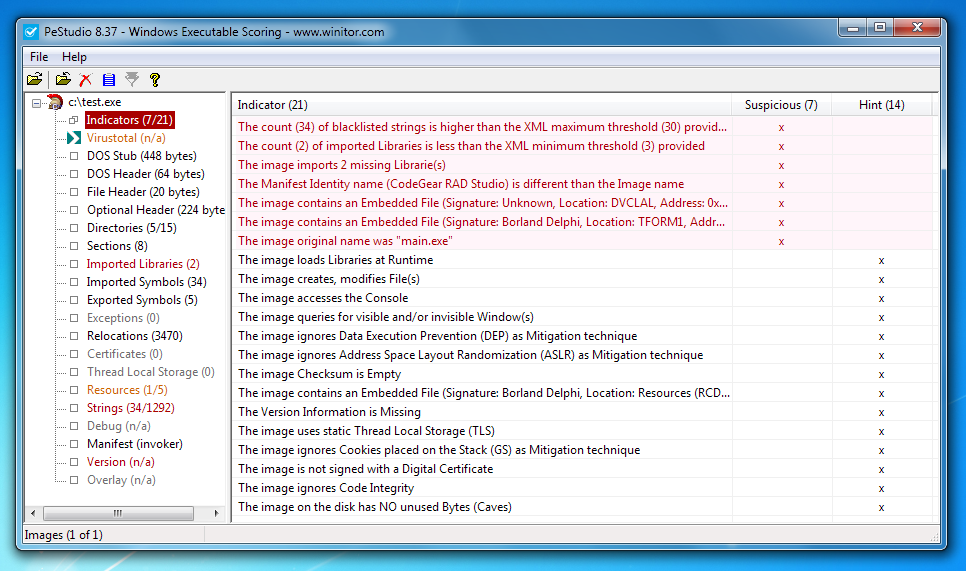
An interesting tool that apart from displaying basic information about exe file, has also a set of rules that can detect incorrect elements in the structure of exe file (all sorts of anomalies) as well as elements that can potentially indicate that the file has been infected. Very useful tool for those who work with PE files every day.
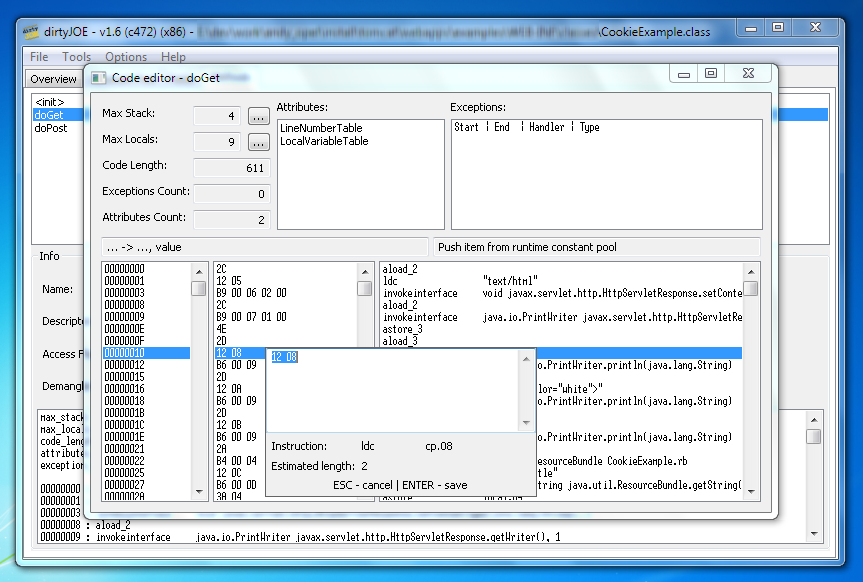
Advanced editor for compiled Java files. Unique tool, developed by Polish author, for code modifying, with built-in disassembler and assembler, this editor allows also for modifying all structures within compiled *.class files. dirtyJOE is useful when we want to modify protected files (after using obfuscator for Java), when traditional methods of decompilation, modification and recompilation fail, dirtyJOE proves irreplacable.
Application files, just like application bundles can contain additional information, like e.g. hidden icons, sound files, libraries, etc. If we want to have a quick check of what's inside the application or e.g. inside the whole installation package of a software, we must use appropriate extractor or ripper.
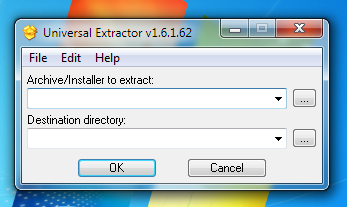
Universal Extractor
This software allows for extraction of files from archives, self unpacking archives and installers. This is very useful when we want to learn what's inside the installer package, where often we can find some additional installation scripts or auxiliary libraries, without actually running the installation process.
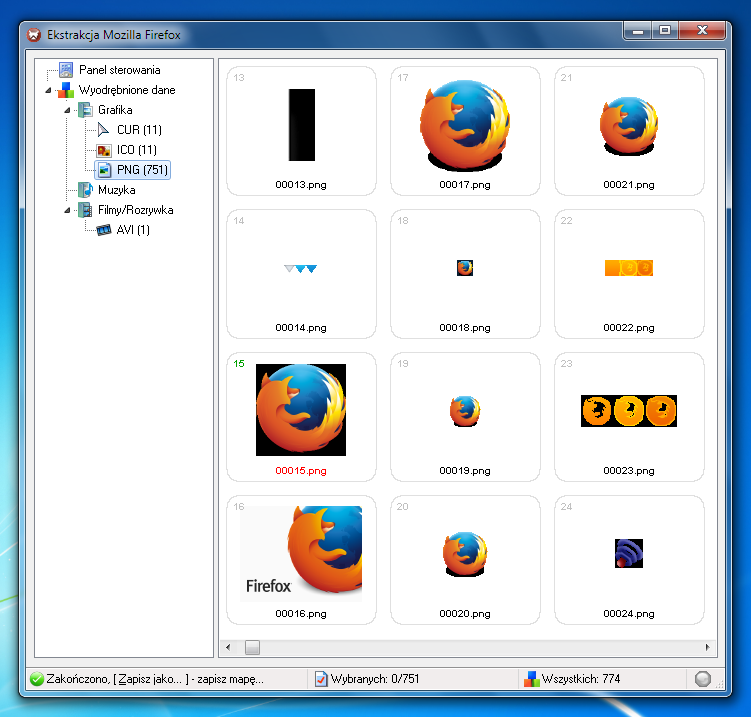
Extractor of all kinds of multimedia files, like graphic files, icons, sound files, movies, 3D models, Flash animations. Dynamic data unpacking from processes memory and simple viewer make this software a very interesting tool, when we want to take a quick peek what's inside application files.
$ uname –a                       => Display linux system information
$ uname –r                       => Display kernel release information (refer uname command in detail)
$ cat /etc/redhat_release        => Show which version of redhat installed
$ uptime                         => Show how long system running + load (learn uptime command)
$ hostname                       => Show system host name
$ hostname -i                    => Display the IP address of the host (all options hostname)
$ last reboot                    => Show system reboot history (more examples last command)
$ date                           => Show the current date and time (options of date command)
$ cal                            => Show this month calendar (what more in cal)
$ w                              => Display who is online (learn more about w command)
$ whoami                         => Who you are logged in as (example + sreenshots)
$ finger user                    => Display information about user (many options of finger command)
2. Hardware
$ dmesg                          => Detected hardware and boot messages (dmesg many more options)
$ cat /proc/cpuinfo              => CPU model
$ cat /proc/meminfo              => Hardware memory
$ cat /proc/interrupts           => Lists the number of interrupts per CPU per I/O device
$ lshw                           => Displays information on hardware configuration of the system
$ lsblk                          => Displays block device related information in Linux (sudo yum install util-linux-ng)
$ free -m                        => Used and free memory (-m for MB) (free command in detail)
$ lspci -tv                      => Show PCI devices (very useful to find vendor ids)
$ lsusb -tv                      => Show USB devices (read more lsusb options)
$ lshal                          => Show a list of all devices with their properties
$ dmidecode                      => Show hardware info from the BIOS (vendor details)
$ hdparm -i /dev/sda	          # Show info about disk sda
$ hdparm -tT /dev/sda	         # Do a read speed test on disk sda
$ badblocks -s /dev/sda	         # Test for unreadable blocks on disk sda
3. Statistics
$ top                              => Display and update the top cpu processes (30 example options)
$ mpstat 1                         => Display processors related statistics (learn mpstat command)
$ vmstat 2                         => Display virtual memory statistics (very useful performance tool)
$ iostat 2                         => Display I/O statistics (2sec Intervals) (more examples)
$ tail -n 500 /var/log/messages    => Last 10 kernel/syslog messages (everyday use tail options)
$ tcpdump -i eth1                  => Capture all packets flows on interface eth1 (useful to sort network issue)
$ tcpdump -i eth0 'port 80'        => Monitor all traffic on port 80 ( HTTP )
$ lsof                             => List all open files belonging to all active processes.(sysadmin favorite command)
$ lsof -u testuser                 => List files opened by specific user
$ free –m                          => Show amount of RAM (daily usage command)
$ watch df –h                      => Watch changeable data continuously(interesting linux command)
$ ls –al                                => Display all information about files/ directories(20 examples)
$ pwd                                   => Show current directory path(simple but need every day)
$ mkdir directory-name                  => Create a directory(create mutiple directory)
$ rm file-name                          => Delete file(be careful of using rm command)
$ rm -r directory-name                  => Delete directory recursively
$ rm -f file-name                       => Forcefully  remove file
$ rm -rf directory-name                 => Forcefully remove directory recursively
$ cp file1 file2                        => Copy file1 to file2 (15 cd command examples)
$ cp -r dir1 dir2                       => Copy dir1 to dir2, create dir2 if it doesn’t  exist
$ mv file1 file2                        => Move files from one place to another(with 10 examples)
$ ln –s  /path/to/file-name  link-name  => Create symbolic link to file-name (examples)
$ touch file                            => Create or update file (timestamp change)
$ cat > file                            => Place standard input into file (15 cat command examples)
$ more file                             => Output the contents of file (help display long tail files)
$ head file                             => Output the first 10 lines of file (with different parameters)
$ tail file                             => Output the last 10 lines of file (detailed article with tail options)
$ tail -f file                          => Output the contents of file as it grows starting with the last 10 lines
$ gpg -c file                           => Encrypt file (how to use gpg)
$ gpg file.gpg                          => Decrypt file
6. Process Related
$ ps                               # Display your currently active processes (many parameters to learn)
$ ps aux | grep 'telnet'           # Find all process id related to telnet process
$ pmap                             # Memory map of process (kernel,user memory etc)
$ top                              # Display all running processes (30 examples)
$ kill pid                         # Kill process with mentioned pid id (types of signals)
$ killall proc                     # Kill all processes named proc
$ pkill processname                # Send signal to a process with its name
$ bg                               # Lists stopped or background jobs (bg and fg command)
$ fg                               # Brings the most recent job to foreground
$ fg n                             # Brings job n to the foreground
7. File Permission Related
$ chmod octal file-name # Change the permissions of file to octal , which can be found separately for user, group and worldoctal value (more examples)
4 - read
2 – write
1 – execute
Example
$ chmod 777 /data/test.c # Set rwx permission for owner , rwx permission for group, rwx permission for world
$ chmod 755 /data/test.c # Set rwx permission for owner,rw for group and world
$ chown owner-user file # Change owner of the file (chown more examples)
$ chown owner-user:owner-group file-name # Change owner and group owner of the file
$ chown owner-user:owner-group directory # Change owner and group owner of the directoryExample
$ chown bobbin:linoxide test.txt
$ ls -l test.txt
-rw-r--r-- 1 bobbin linoxide 0 Mar 04 08:56 test.txt
8. Network
$ ifconfig –a                  # Display all network ports and ip address (set mtu and other all options)
$ ifconfig eth0                # Display specific  ethernet port ip address and details
$ ip addr show                 # Display all network interfaces and ip address(available in iproute2 package,powerful than ifconfig)
$ ip address add 192.168.0.1 dev eth0      # Set ip address
$ ethtool eth0                 # Linux tool to show ethernet status (set full duplex , pause parameter)
$ mii-tool  eth0               # Linux tool to show  ethernet status (more or like ethtool)
$ ping host                    # Send echo request to test connection (learn sing enhanced ping tool)
$ whois domain                 # Get who is information for domain
$ dig domain                   # Get DNS information for domain (screenshots with other available parameters)
$ dig  -x host                 # Reverse lookup host
$ host google.com              # Lookup DNS ip address for the name (8 examples of host command)
$ hostname –i                  # Lookup local ip address (set hostname too)
$ wget file                    # Download file (very useful other option)
$ netstat  -tupl               # Listing all active listening ports(tcp,udp,pid) (13 examples)
9. Compression / Archives
$ tar cf home.tar  home              # Create tar named home.tar containing home/ (11 tar examples)
$ tar xf file.tar                    # Extract the files from file.tar
$ tar czf  file.tar.gz  files        # Create a tar with gzip compression
$ gzip file                          # Compress file and renames it to file.gz (untar gzip file)
$ grep pattern files                 # Search for pattern in files (you will this command often)
$ grep  -r pattern dir                # Search recursively for pattern in dir
$ locate file                        # Find all instances of file
$ find /home/tom -name 'index*'      # Find files names that start with "index"(10 find examples)
$ find /home -size +10000k           # Find files larger than 10000k in /home
12. Login (ssh and telnet)
$ ssh user@host                         # Connect to host as user (secure data communication command)
$ ssh  -p port user@host                # Connect to host using specific port
$ telnet host                           # Connect to the system using  telnet port
13. File Transfer
scp
$ scp file.txt server2:/tmp # Secure copy file.txt to remote host /tmp folder
$ scp nixsavy@server2:/www/*.html /www/tmp # Copy *.html files from remote host to current system /www/tmp folder
$ scp -r nixsavy@server2:/www /www/tmp # Copy all files and folders recursively from remote server to the current system /www/tmp folderrsync
$ rsync -a /home/apps /backup/ # Synchronize source to destination
$ rsync -avz /home/apps linoxide@192.168.10.1:/backup # Synchronize files/directories between the local and remote system with compression enabled
14. Disk Usage
$ df –h                         # Show free space on mounted filesystems(commonly used command)
$ df -i	                        # Show free inodes on mounted filesystems
$ fdisk -l	                # Show disks partitions sizes and types(fdisk command output)
$ du -ah                        # Display disk usage in human readable form (command variations)
$ du -sh                        # Display total disk usage on the current directory
$ findmnt                        # Displays target mount point for all filesystem
$ mount device-path mount-point  # Mount a device
15. Directory Traverse
$ cd ..                              # To go up one level of the directory tree(simple & most needed)
$ cd	                             # Go to $HOME directory
$ cd /test                           # Change to /test directory
Date Posted: August 10th, 2012 Written by Griffon Category: Linux, Others, Ubuntu
Hello World,
As you can see from my previous posts, I’ve been playing around with the Ubuntu 12.04 software. A topic that I wanted to write about since a really long time is the KVM virtualization solution. The KVM virtualization software is built-in in Linux Operating system. I was looking for possible virtualization software that could be used with Ubuntu 12.04 and the first that came into my mind was KVM. However, note that solutions such as virtualbox or vmware (server or player) can be also installed on your Ubuntu machine and have virtualization capabilities. We will investigate these other options in some coming posts.
At the moment, let focus on the KVM Solution…. So, Let’s Go
Introduction
By default, Linux Operating system provides within the kernel virtualization capabilities i.e. Kernel Virtual Machine (kvm). Before enabling the kvm feature, you will first need to ensure that you meet the hardware and software requirements.
Verifying that CPU support virtualization
Before installing any virtualization software, you might want to ensure that you have a cpu with hardware assisted virtualization. Intel-VT cpu and AMD-V are cpu type that support hardware virtualization. In this quite old post, we were already describing the way to check for virtualization support.
To check that your computer support virtualization, you can issuse one of the following commands :
egrep -c ’(vmx |svm’) /proc/cpuinfo
If this command returns the value 0, the cpu does not support hardware virtualization. If the command returns value 1 or greater, your cpu is capable of running virtualization software. The following screenshot shows the output of the command on my system and yes, virtualization is supported.
click on picture for better resolution
Another way to check would be to use the command kvm-ok.
click on picture for better resolution
I issue this command on my system as well and discovered that I was missing some packages (cpu checker). I had to install this package first in order to be able to run the kvm-ok command (see the screenshot below).
click on picture for better resolution
Note :
If you receive a message similar to “INFO: your cpu does not support KVM extensions, KVM acceleration can not be used”, you might still be able to run virtual machines but the performance will not be really good since you will not be using KVM extensions.
If you receive a message similar to KVM Acceleration cannot be used might means that hardwared-assisted virtualization capabilities is present on the system but not activitated in the BIOS
Checking the CPU architecture (32-bit or 64-bit)
We would recommend to run a 64-bit version of Ubuntu 12.04 simply because you will be able to host 32-bit and 64-bit virtual machines. Knowing that the new Microsoft Operating system only support 64-bit, this would make sense. To check this, you can simply try to install ubuntu 64-bit on your system, if the 64-bit architecture is not supported, you will get an error message and the installation process will be stopped.
Another way (if you have already installed Ubuntu) would be to issue the following command
egrep -c ’lm’ /proc/cpuinfo
If the output is O, you are not using a 64-bit CPU. If the Output is 1 or greater, you are running 64-bit CPU and can proceed with the KVM installation
click on picture for better resolution
Note: For your information, you can have kvm installed on a 32-bit system but will be then able to run only 32-bit guests
Verifying that Operating system version
Using the system monitor interface, you can easily check that the operating system you are running is 32-bit or 64-bit. Whatever the desktop interface you are running, type in the dash/activities, system and select system monitor. In the sytem tab, you can see the version of the operating system.
click on picture for better resolution
For the geek, you can also using the command line and digit the following command line (see screenshot)
click on picture for better resolution
If the output is something like x86_x64, you are running a 64-bit
Installating KVM packages
If you reach this section, we assume that you meet the basic requirements in order to have KVM software running. It’s time to download and install the kvm packages. With Ubuntu, this is quite easy. You can use the Ubuntu software GUI based interface or you can use the command line
If you prefer to use the GUI,
Launch the Ubuntu Software Center, and in the search box type qemu-kvm. Click on the package.The package is highlighted and you will see two buttons : more and Install. Click on more button.
click on picture for better resolution
Scroll down and select the 2 additional Add-ons
click on picture for better resolution
You are ready to install the package. Press the Install button (scroll up to see it)
Check that the Bridge-utils package has been installed as well. From the ubuntu Software Center, type in the search box bridge-utils and you should see it already installed. If not, install it
click on picture for better resolution
If you prefer to use the command line ( slightly faster), simply type the following command and wait for the installation to complete.
There are different management tools available with KVM virtualization solution. For this post, we will simply install the ‘de facto’ standard virtual Machine Manager (VMM). To perform the installation, you can use the Ubuntu software Center. In the search box, type virt and you should see in the list the VMM package. click on it and press the install button
click on picture for Better Resolution
You can perform the same installation operation using the command line by issuing the following command
sudo apt-get install virt-manager
After the installation complete, you can try to connect to the management interface (by typing in the Dash/activities search box virtual. the application icons will be displayed. Click on it.
Click on picture for better Resolution
The application will start but you will get immediately an error message. (see screenshot)
Click on picture for Better resolution
Actually, you need to create a new user on your system and to add this user to a specific group (called libvirtd). This will basically grant the right to use the Virt-manager interface. With Ubuntu 12.04, it simply easier to perform the group creation from the command line. By default, Ubuntu 12.04 does not come with a utility to manage groups.
To add your user account (for example griffon) into the group libvirtd, you would type
sudo adduser griffon libvirtd
Note : If you want, you can also install the gnome users and group interface back into Ubuntu by installing the package gnome-system-tools. When installed, you should have a Users and Groups interface that can be used from the GUI.
You will need to logoff and login again in order to have the changes applied. Try to launch the virt-manager application again, and you should be able to have it started. You are now ready to create your first virtual machine using KVM as Hypervisor.
Creating your First virtual machine
It’s time to create you first virtual machine on Ubuntu when using KVM as your preferred Hypervisor. At this stage, you have launched the Virtual Machine Manager and you should see a dialog box similar to this one
Click on picture for Better resolution
click on the highlighted computer icon and the New virtual machine wizard starts.
Click on picture for Better resolution
Provide the information and Press Forward.
In the following screen, select the installation source and the type of virtual machine that you want to install. Press Forward
Click on picture for Better resolution
In the next screen, simply specify CPU and Memory information. Press Forward
Click on picture for Better resolution
In the next screen, provide the information about the virtual disk to created and Press Forward
Click on picture for Better resolution
In the final screen, provide the information about the Virtual networking and Press Finish
Click on picture for Better resolution
At this stage, you will need to perform the installation of your operating system and you should be ready to go for the rest of your journey
Final Notes
And Voila. We have just installed a virtualization solution on our ubuntu computer. For me, this was the first time I was playing with KVM. Nowadays, It’s really easy to enable virtualization solution within Linux Operating system. You install a bunch of additional packages and you are ready to go. A positive point also is that the process is actually well documented. I’ve found plenty of information on internet when I was stucked with my setup.
Something we didn’t speak about is the kvm management options. You can manage your virtual machines using command line (great for automation), via the Virt-Manager or you can install other kvm mangement tools like oVirt2 to perform your day to day activities. If I have some spare time, we might want to investigate these solutions.
The only drawback (I can see ) might be the fact that KVM does not support 3D acceleration. If you have need that, you might want to go for another virtualization option (virtualbox or vmware) on top of your ubuntu operating system
Get Debian here: http://www.debian.org/distrib/netinst. I used the small CD version. Burn the iso and boot the CD. Choose the default options (or as appropriate for your site). When you get to the “Software Selection” screen, unselect all options to get a bare minimum install. After the install finishes, the CD ejects and the system will reboot. Log back in as root.
Requirements:
Installing python 2.7 To install python 2.7, we will need to fix some dependencies first:
apt-get install libssl-dev libncurses5-dev libsqlite3-dev libbz2-dev libreadline5-dev libgdbm-dev make
Once the packages have been downloaded an installed, lets download and install python 2.7.
wget http://www.python.org/ftp/python/2.7.3/Python-2.7.3.tgz tar -xvzf Python-2.7.3.tgz cd Python-2.7.3 ./configure –prefix=/opt/python2.7 make make install
Ok, python 2.7 installed, lets link it to our /usr/bin
cd /usr/bin ln -s /opt/python2.7/bin/python2.7 python2.7 ln -s python2.7 python
Installing Cuckoo requirements: In order to properly function, Cuckoo requires SQLAlchemy to be installed but the version that apt downloads does not work properly so we are going to install setuptools first to install the latest version of SQLAlchemy and other cuckoo requirements.
Download and installation of setuptools:
wget http://pypi.python.org/packages/2.7/s/setuptools/setuptools-0.6c11-py2.7.egg sh setuptools-0.6c11-py2.7.egg cd /opt/bin ln -s /opt/python2.7/bin/easy_install easy_install
Installation of SQLAlchemy and other Cuckoo requirements (python-magic, bottle, pefile, pymongo, argparse and jinja2):


