CreateMutex
까보면 다나와~
분류 전체보기 (216)

PYTHON 파이똥 한글 인코딩 문제 참고..

#!/usr/bin/python

# -*- coding: utf-8 -*-

# -*- coding: euc-kr -*- //우분투에서 필수 영문ver


print u'\uc548\ub155\ud558\uc138\uc694gkgksd'


#print unicode('한글asdfasdfasdfasdf','EUC-KR') //우분투 

#print unicode('한글asdfasdfasdfasdf','MBCS')

#print unicode('한글asdfasdfasdfasdf','EUC-KR').ENCODE('UTF-8')

print unicode('한글asdfasdfasdfasdf')

print unicode('윈도우즈 파이썬은 기본적으로 EUC-KR 인코딩')

print unicode('우분투 파이썬은 EUC-KR 인코딩해야함') //영문ver

  Comments,     Trackbacks

ghost, gh0st 관련 정보

오픈소스로 된 고스트 원격제어툴, 현재까지도 중국에서 엄청나게 악성코드로 뿌려지고 있다.
Darkshell, Redosdru 등 탐지 이름도 많다.

http://blogs.norman.com/2012/security-research/the-many-faces-of-gh0st-rat

------------------------

The many faces of Gh0st Rat

Gh0st Rat is an open source backdoor trojan (or “Remote Administration Tool” ) that has been used in a large number of incidents, of which many have been targeted attacks. It is famed for being used in the espionage operation called “GhostNet”.

It is originally Chinese which naturally means that it is popular to use by Chinese hackers.

In a study conducted here at Norman, we have attempted to unmask the links that exist between different known Gh0st Rat attack campaigns. We primarily used the network communication as recognizable characteristic, since Gh0st communication is quite distinctive – it uses a “magic tag” (usually 5 alphanumeric letters) to identify itself to the command & control server.

We clustered samples that used the same tags together, to make plots like this:

brown nodes = samples, purple nodes = IP addresses, yellow nodes = domains, blue nodes = identifier tag

Fig1 : Same Gh0st variant (called “cb1st” because of its communication tag) is seen using two main C&C hubs and many smaller. The hub www.wk1888.com is also used by a large cluster of trojans using the default “Gh0st” tag, branching out at the right.

In the above plot we see that samples of one type (“cb1st”) connect to the same Command&Control server as samples of another type – “Gh0st”, thus these samples can be said to be logically linked.

Other connections were discovered, surprisingly, by miscommunication between the malware and its C&C server. In quite a large number of cases, the server responded to the initial connection by using a different magic tag. In a way, the malware said “Are you there”, and the server said “Que?”.

Fig2 Gh0st Rat of the KOBBX variant attempts to talk to the server, but receives LUCKK back.

Obviously the KOBBX and LUCKK campaigns are connected.

Not only Gh0st Rats exhibited this odd behavior. We also saw other malware miscommunicating in this way, for example DarkShell DDOS bots.

Fig3 DarkShell initial connection receiving “whmhl”, a tag belonging to a particular Gh0st variation.

In our paper, we have examined and clustered 49 variations of Gh0st, divided over some 1200 samples from 2011-2012. We found that a great many Gh0st Rat clusters likely are produced and operated by the same persons or groups.

Fig4 Eight different Gh0st variations that are linked in a “supercluster”.

We have attempted to trace some of the attacks back to apparent perpetrators.

The full paper is 70 pages long, and is available by filling out a request here:
The many faces of Gh0st Rat
It’s free. We won’t try to sell you anything.

'악성코드 소식' 카테고리의 다른 글

Shedding New Light on Tor-Based Malware  (0) 2014.03.12
Targeted ‘phone ring flooding’  (0) 2013.02.14
Red October  (0) 2013.01.16
Ole Trade Tool 악성코드  (0) 2010.12.13
Koobface 새로운 버젼입니다~  (0) 2010.10.28
  Comments,     Trackbacks

Kimsuky APT 악성코드?? 북한발 악성코드라는데..

http://www.securelist.com/en/blog/208214062/Kimsuky_APT_Operations_possible_North_Korean_links_uncovered


북한에서 제작한 걸로 추정하는 분석내용이네요.

카스퍼스키는 예전에도 이슈가 될 만한 악성코드를 참 잘 찾아내더 군요.


  • The public e-mail server in question was Bulgarian - mail.bg.
  • The compilation path string contained Korean hieroglyphs. 


이런 내용을 보면 자동화된 분석으로 찾아낸 거 같기도하고.. 어쨌건 부럽네요.


그리고 요즘은 외국 블로그 같은 곳에서 한국에서 일어나는 사이버 보안관련 이슈를

상당히 관심있게 보고 있다는 느낌이 듭니다. 그간의 일들(?)이 그 이유겠지요. ㅎ


좋은 감시 프로그램 잘 만들어야겠다는 생각이 들어서... 주저리주저리 ㅋ

'아리스리생각' 카테고리의 다른 글

import hashing  (0) 2015.02.23
Naming is analysis and research  (0) 2014.01.10
진실 혹은 거짓~  (0) 2013.01.28
악성코드 경유지, 유포지 사이트???  (2) 2013.01.11
분석이라..  (0) 2012.08.02
  Comments,     Trackbacks

MFC 리버싱하기

MFC 리버싱하기


요약
AfxWinMain
- AfxGetModuleThreadState
- AfxGetModuleState
- AfxWinInit
- CWinApp::InitApplication (?InitApplication@CWinApp@@UAEHXZ)
 - call dword ptr [eax+58h], that is pThread->InitInstance (main code)
call    ?DoModal@CDialog@@UAEHXZ ; CDialog::DoModal(void)
DoModal 콜하기 바로 전에 mov [esi], eax 또는 mov [esi+20], eax 이런 어셈코드가 있는데 eax + 30  이것이 MessageMap entry를 호출하는 GetMessageMap Function

자세한 설명은 아래.

good~!!

http://quequero.org/2008/08/guidelines-to-mfc-reversing/

Guidelines to MFC Reversing

Software developed with MFC may import MFC80U.dll (MFC80U is the name of the last version of the dll, as I’m writing), it depends on the type of compilation: as a static library or as a shared DLL.
I’ll analyze a software which imports the dll and has debug infos, just to make the job easier.
Once you understand MFC in this way, you can analyze MFC software compiled statically just adding to IDA the signatures of MFC and VisualC.


Prologue: What is MFC?

The Microsoft Foundation Classes Library (also Microsoft Foundation Classes or MFC) is a library that wraps portions of the Windows API in C++ classes, including functionality that allows to use a default application framework. Classes are defined for many of the handle-managed Windows objects and also for predefined windows and common controls.


Tools – References

IDA
Reversing Microsoft Visual C++ Part II: Classes, Methods and RTTI
Crackme


Essay

This is a standard C source code for windows:

1
2
3
4
5
6
7
8
9
10
11
12
13
14
15
16
LRESULT CALLBACK DialogProc(HWND hWnd, UINT uMsg, WPARAM wParam, LPARAM lParam)
{
        switch(uMsg)
        {
        case WM_COMMAND:
                switch(LOWORD(wParam))
                {
 
                case IDC_ABOUT:
                        DialogBoxParam(GetModuleHandle(NULL), MAKEINTRESOURCE(IDD_DIALOG1), NULL, (DLGPROC)MainDialogProc, 0);
                        break;
 
                        // ...
                }
        }
}

Instead this is source code that uses MFC:

class CAboutDlg : public CDialog
{
public:
        CAboutDlg();
 
// Dialog Data
        enum { IDD = IDD_ABOUTBOX };
 
protected:
        virtual void DoDataExchange(CDataExchange* pDX);    // DDX/DDV support
 
// Implementation
protected:
        DECLARE_MESSAGE_MAP()
};
 
CAboutDlg::CAboutDlg() : CDialog(CAboutDlg::IDD)  //CAboutDlg::IDD is dialog ID         
{
}
 
void CAboutDlg::DoDataExchange(CDataExchange* pDX)
{
        CDialog::DoDataExchange(pDX);
}
 
BEGIN_MESSAGE_MAP(CAboutDlg, CDialog) //Dialog Message Map: is like DialogProc
END_MESSAGE_MAP()
 
// App command to run the dialog
void CProvaRevApp::OnAppAbout()
{
        CAboutDlg aboutDlg;
        aboutDlg.DoModal();
}

How you can imagine the disasm of MFC software is harder to understand.

MFC Main

This is the Main disasm of our target:

.text:00401CBB                 public start
.text:00401CBB                 call    ___security_init_cookie
.text:00401CC0                 jmp     ___tmainCRTStartup
 
.text:004019FB ___tmainCRTStartup proc near           ; CODE XREF: start+5�j
.text:004019FB
.text:004019FB                 push    5Ch
.text:004019FD                 push    offset unk_403DD8
.text:00401A02                 call    __SEH_prolog4
;... other initialization code
.text:00401B3E                 push    ecx            ; nShowCmd
.text:00401B3F                 push    eax            ; lpCmdLine
.text:00401B40                 push    ebx            ; hPrevInstance
.text:00401B41                 push    400000h        ; hInstance
.text:00401B46                 call    _wWinMain@16   ; wWinMain(x,x,x,x)
 
; int __stdcall wWinMain(HINSTANCE hInstance, HINSTANCE hPrevInstance, LPWSTR lpCmdLine, int nShowCmd)
_wWinMain@16 proc near
        jmp     ?AfxWinMain@@YGHPAUHINSTANCE__@@0PA_WH@Z ; AfxWinMain(HINSTANCE__ *,HINSTANCE__ *,wchar_t *,int)
_wWinMain@16 endp

As you can see WinMain calls AfxWinMain.
If you have VisualStudio you can see MFC source code, in this article I’ll report only the functions we’ll need.

int AFXAPI AfxWinMain(HINSTANCE hInstance, HINSTANCE hPrevInstance,
        _In_ LPTSTR lpCmdLine, int nCmdShow)
{
        ASSERT(hPrevInstance == NULL);
 
        int nReturnCode = -1;
        CWinThread* pThread = AfxGetThread();
        CWinApp* pApp = AfxGetApp();
 
        // AFX internal initialization
        if (!AfxWinInit(hInstance, hPrevInstance, lpCmdLine, nCmdShow))
                goto InitFailure;
 
        // App global initializations (rare)
        if (pApp != NULL && !pApp->InitApplication())
                goto InitFailure;
 
        // Perform specific initializations
        if (!pThread->InitInstance())
        {
                if (pThread->m_pMainWnd != NULL)
                {
                        TRACE(traceAppMsg, 0, "Warning: Destroying non-NULL m_pMainWnd\n");
                        pThread->m_pMainWnd->DestroyWindow();
                }
                nReturnCode = pThread->ExitInstance();
                goto InitFailure;
        }
        nReturnCode = pThread->Run();
 
InitFailure:
        AfxWinTerm();
        return nReturnCode;
}

This is the disasm of AfxWinMain:

.text:7831D2D2                 public AfxWinMain
.text:7831D2D2 AfxWinMain      proc near
.text:7831D2D2                 push    ebx
.text:7831D2D3                 push    esi
.text:7831D2D4                 push    edi
.text:7831D2D5                 or      ebx, 0FFFFFFFFh
.text:7831D2D8                 call    AfxGetModuleThreadState
.text:7831D2DD                 mov     esi, [eax+4] ;pThread
.text:7831D2E0                 call    AfxGetModuleState
.text:7831D2E5                 push    [esp+0Ch+arg_C]
.text:7831D2E9                 mov     edi, [eax+4] ;pApp
.text:7831D2EC                 push    [esp+10h+arg_8]
.text:7831D2F0                 push    [esp+14h+arg_4]
.text:7831D2F4                 push    [esp+18h+arg_0]
.text:7831D2F8                 call    AfxWinInit
.text:7831D2FD                 test    eax, eax
.text:7831D2FF                 jz      short loc_7831D33D
.text:7831D301                 test    edi, edi   
.text:7831D303                 jz      short loc_7831D313
.text:7831D305                 mov     eax, [edi]
.text:7831D307                 mov     ecx, edi
.text:7831D309                 call    dword ptr [eax+98h]
.text:7831D30F                 test    eax, eax
.text:7831D311                 jz      short loc_7831D33D
.text:7831D313
.text:7831D313 loc_7831D313:
.text:7831D313                 mov     eax, [esi]
.text:7831D315                 mov     ecx, esi
.text:7831D317                 call    dword ptr [eax+58h]
.text:7831D31A                 test    eax, eax
.text:7831D31C                 jnz     short loc_7831D334
.text:7831D31E                 cmp     [esi+20h], eax
.text:7831D321                 jz      short loc_7831D32B
.text:7831D323                 mov     ecx, [esi+20h]
.text:7831D326                 mov     eax, [ecx]
.text:7831D328                 call    dword ptr [eax+68h]
.text:7831D32B
.text:7831D32B loc_7831D32B:
.text:7831D32B                 mov     eax, [esi]
.text:7831D32D                 mov     ecx, esi
.text:7831D32F                 call    dword ptr [eax+70h]
.text:7831D332                 jmp     short loc_7831D33B
.text:7831D334
.text:7831D334 loc_7831D334:
.text:7831D334                 mov     eax, [esi]
.text:7831D336                 mov     ecx, esi
.text:7831D338                 call    dword ptr [eax+5Ch]
.text:7831D33B
.text:7831D33B loc_7831D33B
.text:7831D33B                 mov     ebx, eax
.text:7831D33D
.text:7831D33D loc_7831D33D:
.text:7831D33D                 call    AfxWinTerm
.text:7831D342                 pop     edi
.text:7831D343                 pop     esi
.text:7831D344                 mov     eax, ebx
.text:7831D346                 pop     ebx
.text:7831D347                 retn    10h
.text:7831D347 AfxWinMain      endp

In the code there are calls as call [eax+XXh]: actually the call to AfxGetApp (and AfxGetThread) gives back a pointer to a structure that has offsets of all functions used by MFC framework.
In this case edi (pApp) holds the offset of 405498, which value is 40349C VA, where the virtual functions table of CWinApp is stored:

.rdata:0040349C off_40349C      dd offset ?GetRuntimeClass@CWinApp@@UBEPAUCRuntimeClass@@XZ;CWinApp::GetRuntimeClass(void)
.rdata:004034A0                 dd offset sub_401010
.rdata:004034A4                 dd offset nullsub_1
.rdata:004034A8                 dd offset nullsub_2
.rdata:004034AC                 dd offset nullsub_1
.rdata:004034B0                 dd offset ?OnCmdMsg@CCmdTarget@@UAEHIHPAXPAUAFX_CMDHANDLERINFO@@@Z ; CCmdTarget::OnCmdMsg(uint,int,void *,AFX_CMDHANDLERINFO *)
.rdata:004034B4                 dd offset ?OnFinalRelease@CCmdTarget@@UAEXXZ ; CCmdTarget::OnFinalRelease(void)
.rdata:004034B8                 dd offset ?IsInvokeAllowed@CCmdTarget@@UAEHJ@Z ; CCmdTarget::IsInvokeAllowed(long)
.rdata:004034BC                 dd offset ?GetDispatchIID@CCmdTarget@@UAEHPAU_GUID@@@Z ; CCmdTarget::GetDispatchIID(_GUID *)
.rdata:004034C0                 dd offset ?GetTypeInfoCount@CCmdTarget@@UAEIXZ ; CCmdTarget::GetTypeInfoCount(void)
.rdata:004034C4                 dd offset ?GetTypeLibCache@CCmdTarget@@UAEPAVCTypeLibCache@@XZ ; CCmdTarget::GetTypeLibCache(void)
.rdata:004034C8                 dd offset ?GetTypeLib@CCmdTarget@@UAEJKPAPAUITypeLib@@@Z ; CCmdTarget::GetTypeLib(ulong,ITypeLib * *)
.rdata:004034CC                 dd offset sub_401000
;.......................................................

Now a question should pop up in your mind: where does MFC get the address? A quick glance at the reference with IDA…

.text:004023B0 sub_4023B0      proc near             
.text:004023B0                 push    0
.text:004023B2                 mov     ecx, offset dword_405498
.text:004023B7                 call    ??0CWinApp@@QAE@PB_W@Z ; CWinApp::CWinApp(wchar_t const *)
.text:004023BC                 push    offset sub_4023F0 ; void (__cdecl *)()
.text:004023C1                 mov     dword_405498, offset off_40349C ;<-- this is our offset
.text:004023CB                 call    _atexit
.text:004023D0                 pop     ecx
.text:004023D1                 retn
.text:004023D1 sub_4023B0      endp

This VA, 004023B0, is present in a structure

1
2
3
4
5
6
7
.rdata:00403304 unk_403304      db    0   
.rdata:00403305                 db    0
.rdata:00403306                 db    0
.rdata:00403307                 db    0
.rdata:00403308                 dd offset _pre_cpp_init
.rdata:0040330C                 dd offset ??__E_afxInitAppState@@YAXXZ ; `dynamic initializer for'_afxInitAppState''(void)
.rdata:00403310                 dd offset sub_4023B0

which is pushed to __initterm, called before WinMain

.text:00401AAC                 push    offset unk_403314
.text:00401AB1                 push    offset unk_403304
.text:00401AB6                 call    _initterm

After this excursus, let’s go back to AfxWinMain:
call dword ptr [eax+98h] (40349C + 98 = 00403534) calls…

.text:00403534                 dd offset ?InitApplication@CWinApp@@UAEHXZ ; CWinApp::InitApplication(void)

…while call dword ptr [eax+58h], that is pThread->InitInstance, calls the function:

1
.rdata:004034F4                 dd offset sub_401030

This function shows the dialog window, here is the main part of the code:

1
2
3
4
5
6
7
8
9
10
11
12
13
14
15
16
17
18
19
20
21
22
23
24
25
26
27
28
29
.text:00401030 sub_401030      proc near 
.text:00401030                 push    ebp
.text:00401031                 mov     ebp, esp
;..........................................................................
.text:0040109F                 call    sub_401130
;--------------------------------------------------------------------------
;entrato nella call
.text:00401155                 push    0              ; lpIconName
.text:00401157                 push    66h            ; Dialog ID
.text:00401159                 mov     ecx, esi
.text:0040115B                 call    ??0CDialog@@QAE@IPAVCWnd@@@Z ; CDialog::CDialog(uint,CWnd *)
.text:00401160                 mov     [esp+14h+var_4], 0
.text:00401168                 mov     dword ptr [esi], offset off_403744 ;virtual functions table offset which is store
; in CDialog.DoModal -> CDialog__PreModal -> AfxHookWindowCreate 
.text:0040116E                 call    ?AfxGetModuleState@@YGPAVAFX_MODULE_STATE@@XZ ; AfxGetModuleState(void)
;exit the call
;---------------------------------------------------------------------------
.text:004010A4                 lea     edx, [esp+8+arg_4]
.text:004010A8                 mov     [esp+8+arg_88], 0
.text:004010B3                 mov     ecx, edx
.text:004010B5                 mov     [esi+20h], edx
.text:004010B8                 call    ?DoModal@CDialog@@UAEHXZ ; CDialog::DoModal(void)
.text:004010BD                 lea     ecx, [esp+8+arg_4]
.text:004010C1                 mov     [esp+8+arg_88], 0FFFFFFFFh
.text:004010CC                 call    ??1CDialog@@UAE@XZ ; CDialog::~CDialog(void)
;..........................................................................
.text:004010E3                 mov     esp, ebp
.text:004010E5                 pop     ebp
.text:004010E6                 retn


Get MESSAGE_MAP

But where is MESSAGE_MAP?: Message Map can be get from

BOOL CWnd::OnWndMsg(UINT message, WPARAM wParam, LPARAM lParam, LRESULT* pResult)
{
     // ....
     const AFX_MSGMAP* pMessageMap;
     pMessageMap = GetMessageMap();
     // ....
          if ((lpEntry = AfxFindMessageEntry(pMessageMap->lpEntries, message, 0, 0)) != NULL)
     // ...
 
}

This is the disasm

.text:78312E91                 mov     eax, [edi] ; eax = 403744
.text:78312E93                 mov     ecx, edi
.text:78312E95                 call    dword ptr [eax+30h] ; eax+30h = 00403774 = GetMessageMap()
;.rdata:00403774                 dd offset sub_4011E0
;...................................................................
.text:78312F1B                 push    0
.text:78312F1D                 push    0
.text:78312F1F                 jnb     short loc_78312F67
.text:78312F21                 push    [ebp+arg_0] ;messagge
.text:78312F24                 push    dword ptr [esi+4] ; lpEntries (0040362C)
.text:78312F27                 call    AfxFindMessageEntry

The call in 78312E95 leads us to:

;GetMessageMap()
.text:004011E0                 mov     eax, offset off_403628 ;eax = pMessageMap
.text:004011E5                 retn
;----------------------------------------------------------------
;pMessageMap
.rdata:00403628 off_403628      dd offset ?GetThisMessageMap@CDialog@@KGPBUAFX_MSGMAP@@XZ
.rdata:00403628                                        ; CDialog::GetThisMessageMap(void)
.rdata:0040362C                 dd offset unk_403580 ;pMessageMap->lpEntries

At 403580 there’s the MESSAGE_MAP of this dialog.

So we can get the MessageMap quickly this way:

  1. Find before a call to CDialog:DoModal an istruction like this: mov dword ptr [esi], offset off_XXXXXX (it is used to load virtual functions table).
  2. Add 0×30 to that offset to get GetMessageMap function: into that function, look for the instruction mov eax, offset off_XXXXXX, where eax is pMessageMap
  3. Add 4 to pMessageMap to get Dialog MessageMap

Now an example. This is the software resource:

CONTROL "Register", 1006, BUTTON, //1006 = 0x3ee
CONTROL "About", 1007, BUTTON, //1007 = 0x3ef
CONTROL "Cancel", 1008, BUTTON, //1008 = 0x3f0

And this is its MESSAGE_MAP, which is an array of structures

struct AFX_MSGMAP_ENTRY
{
        UINT nMessage;   // windows message
        UINT nCode;      // control code or WM_NOTIFY code
        UINT nID;        // control ID (or 0 for windows messages)
        UINT nLastID;    // used for entries specifying a range of control id's
        UINT_PTR nSig;       // signature type (action) or pointer to message #
        AFX_PMSG pfn;    // routine to call (or special value)
};
.rdata:00403580 MESSAGE_MAP    dd 112h               
.rdata:00403584                 dd 0
.rdata:00403588                 dd 0
.rdata:0040358C                 dd 0
.rdata:00403590                 dd 1Eh
.rdata:00403594                 dd offset sub_4012D0
 
.rdata:00403598                 dd 0Fh
.rdata:0040359C                 dd 0
.rdata:004035A0                 dd 0
.rdata:004035A4                 dd 0
.rdata:004035A8                 dd 13h
.rdata:004035AC                 dd offset sub_401370
 
.rdata:004035B0                 dd 37h
.rdata:004035B4                 dd 0
.rdata:004035B8                 dd 0
.rdata:004035BC                 dd 0
.rdata:004035C0                 dd 28h
.rdata:004035C4                 dd offset sub_401450
 
.rdata:004035C8                 dd 111h
.rdata:004035CC                 dd 0
.rdata:004035D0                 dd 3EFh 
.rdata:004035D4                 dd 3EFh 
.rdata:004035D8                 dd 38h
.rdata:004035DC                 dd offset sub_401460
 
.rdata:004035E0                 dd 111h
.rdata:004035E4                 dd 0
.rdata:004035E8                 dd 3F0h 
.rdata:004035EC                 dd 3F0h
.rdata:004035F0                 dd 38h
.rdata:004035F4                 dd offset sub_4014F0
 
.rdata:004035F8                 dd 111h
.rdata:004035FC                 dd 0
.rdata:00403600                 dd 3EEh 
.rdata:00403604                 dd 3EEh
.rdata:00403608                 dd 38h
.rdata:0040360C                 dd offset sub_401510
 
.rdata:00403610                 dd 0
...

Every event has a structure where window ID and the function to use are stored.
 

IDC Script

1
2
3
4
5
6
7
8
9
10
11
12
13
14
15
16
17
18
19
20
21
22
23
24
25
26
27
28
29
30
31
32
33
34
35
36
37
38
39
40
41
42
43
44
45
46
47
48
49
50
51
52
53
54
55
56
57
58
59
60
61
62
63
64
65
66
67
68
69
70
71
72
73
74
75
76
77
78
79
80
81
82
83
84
85
86
87
88
89
90
91
92
93
94
95
96
97
98
99
100
101
102
103
104
105
106
107
108
109
110
111
112
113
114
115
116
117
118
// mfc_message_map.idc version 0.2 by Pn 2008
#include <idc.idc>
 
//Only some WM_ command are recognized
static messageName(ptr, message) {
 
        if(message == 1) // WM_CREATE
                MakeComm(ptr, "WM_CREATE");
        else if(message == 2) // WM_DESTROY
                MakeComm(ptr, "WM_DESTROY");
        else if(message == 5) // WM_SIZE
                MakeComm(ptr, "WM_SIZE");
        else if(message == 0x10) // WM_CLOSE
                MakeComm(ptr, "WM_CLOSE");
        else if(message == 0x18) // WM_SHOWWINDOW
                MakeComm(ptr, "WM_SHOWWINDOW");
 
        else if(message == 0x0100) // WM_KEYDOWN
                MakeComm(ptr, "WM_KEYDOWN");
        else if(message == 0x0101) // WM_KEYUP
                MakeComm(ptr, "WM_KEYUP");
        else if(message == 0x0102) // WM_CHAR
                MakeComm(ptr, "WM_KEYCHAR");
 
        else if(message == 0x0110) // WM_INITDIALOG
                MakeComm(ptr, "WM_INITDIALOG");
        else if(message == 0x0111) // WM_COMMAND
                MakeComm(ptr, "WM_COMMAND");
        else if(message == 0x0112) // WM_SYSCOMMAND
                MakeComm(ptr, "WM_SYSCOMMAND");
        else if(message == 0x0113) // WM_TIMER
                MakeComm(ptr, "WM_TIMER");
        else if(message == 0x0116) // WM_INITMENU
                MakeComm(ptr, "WM_INITMENU");
        else if(message == 0x0117) // WM_INITMENUPOPUP
                MakeComm(ptr, "WM_INITMENUPOPUP");
        else if(message == 0x0126) // WM_MENUCOMMAND
                MakeComm(ptr, "WM_MENUCOMMAND");
 
}
static DefineStruct() {
        auto idStruct;
 
        idStruct = AddStrucEx(-1,"AFX_MSGMAP_ENTRY",0);
        if(idStruct == 0) return 0;
 
        if(AddStrucMember(idStruct, "nMessage", 0, FF_DWRD|FF_DATA, -1, 4) != 0) {
                Warning("\n1\n");
                DelStruc(idStruct);
                return 0;
        }
 
        if(AddStrucMember(idStruct, "nCode", 4, FF_DWRD|FF_DATA, -1, 4) != 0) {
                Warning("\n2\n");
                DelStruc(idStruct);
                return 0;
        }
 
        if(AddStrucMember(idStruct, "nID", 8, FF_DWRD|FF_DATA, -1, 4) != 0) {
                Warning("\n3\n");
                DelStruc(idStruct);
                return 0;
        }
 
        if(AddStrucMember(idStruct, "nLastID", 12, FF_DWRD|FF_DATA, -1, 4) != 0) {
                Warning("\n4\n");
                DelStruc(idStruct);
                return 0;
        }
 
        if(AddStrucMember(idStruct, "nSignature", 16, FF_DWRD|FF_DATA, -1, 4) != 0) {
                Warning("\n5\n");
                DelStruc(idStruct);
                return 0;
        }
 
        if(AddStrucMember(idStruct, "pFunction", 20, FF_DWRD|FF_0OFF, -1, 4) != 0) {
                Warning("\n6\n");
                DelStruc(idStruct);
                return 0;
        }
 
        return idStruct;
}
 
static GenerateMFCMap(addr) {
        auto idStruct, ptr, message, isOk;
 
        idStruct = GetStrucIdByName("AFX_MSGMAP_ENTRY");
        if( idStruct == -1) {
                idStruct = DefineStruct();
                if(idStruct == 0) {
                        Warning("\nCannot declare the structure\n"); 
                        return;
                }
        }
 
        ptr = addr;
        isOk = 1;
 
        while( Dword(ptr) != 0) {
                if(MakeStructEx(ptr, 24, "AFX_MSGMAP_ENTRY") == 0) {
                        isOk = 0;
                        break;
                }
                                messageName(ptr,Dword(ptr));
 
                ptr = ptr + 24;
        }
 
        if(isOk == 0) {
                Warning("\nCannot set the structure at %x\n", addr);
        } else {
                Message("Completed");
        }
 
        return;
}

This is the disasm after I used the script on it:

.rdata:00403580 stru_403580     AFX_MSGMAP_ENTRY <112h, 0, 0, 0, 1Eh, offset sub_4012D0> ; WM_SYSCOMMAND
.rdata:00403580                                        ; DATA XREF: .rdata:0040362C�o
.rdata:00403598                 AFX_MSGMAP_ENTRY <0Fh, 0, 0, 0, 13h, offset sub_401370>
.rdata:004035B0                 AFX_MSGMAP_ENTRY <37h, 0, 0, 0, 28h, offset sub_401450>
.rdata:004035C8                 AFX_MSGMAP_ENTRY <111h, 0, 3EFh, 3EFh, 38h, offset sub_401460> ; WM_COMMAND
.rdata:004035E0                 AFX_MSGMAP_ENTRY <111h, 0, 3F0h, 3F0h, 38h, offset sub_4014F0> ; WM_COMMAND
.rdata:004035F8                 AFX_MSGMAP_ENTRY <111h, 0, 3EEh, 3EEh, 38h, offset sub_401510> ; WM_COMMAND
.rdata:00403610                 db    0


Retrieve WM_COMMAND

The function BOOL CCmdTarget::OnCmdMsg(UINT nID, int nCode, void* pExtra, AFX_CMDHANDLERINFO* pHandlerInfo), precisely the function _AfxDispatchCmdMsg, handles WM_COMMAND event.
Actually if you set a bp on it you can see that after a button or a menu is clicked on, the debugger halts the execution. By stepping you can enter the function called for that event, without having to retrieve the MESSAGE_MAP.


  Comments,     Trackbacks

Decompilers


  • Debuggers:
    • OllyDbg, free, a fine debugger, for which you can find numerous user-made plugins and scripts to make it all the more useful.
    • WinDbg, free, a quite capable debugger by Microsoft. WinDbg is especially useful for looking at the Windows internals, since it knows more about the data structures than other debuggers.
    • SoftICE, SICE to friends. Commercial and development stopped in 2006. SoftICE is kind of a hardcore tool that runs beneath the operating system (and halts the whole system when invoked). SoftICE is still used by many professionals, although might be hard to obtain and might not work on some hardware (or software - namely, it will not work on Vista or NVIDIA gfx cards).
  • Disassemblers:
    • IDA Pro, commercial, top of the line disassembler/debugger. Used by most professionals, like malware analysts etc. Costs quite a few bucks though.
    • W32Dasm, free, a bit dated but gets the job done. I believe W32Dasm is abandonware these days, and there are numerous user-created hacks to add some very useful functionality. You'll have to look around to find the best version.
  • Decompilers:
    • Visual Basic: VB Decompiler, commercial, produces somewhat identifiable bytecode.
    • Delphi: DeDe, free, produces good quality source code.
    • C: HexRays, commercial, a plugin for IDA Pro by the same company. Produces great results but costs a big buck, and won't be sold to just anyone (or so I hear).
    • .NET(C#): dotPeek, free, decompiles .NET 1.0-4.5 assemblies to C#. Support for .dll, .exe, .zip, .vsix, .nupkg, and .winmd files.

Some related tools that might come handy in whatever it is you're doing are resource editors such asResourceHacker (free) and a good hex editor such as Hex Workshop (commercial).

  Comments,     Trackbacks

스크린캡쳐

최근 악성코드가 사용한 캡쳐 코드

{

  i = 0;

  do

  {

    v5 = 1;

    v6 = 0;

    v7 = 0;

    v8 = 0;

    GdiplusStartup(&v4, &v5, &v13);

    v1 = CreateDCA("DISPLAY", 0, 0, 0);

    H_value = GetDeviceCaps(v1, 8);             // H(가로)

    V_value = GetDeviceCaps(v1, 10);            // V(세로)

    v10 = 0;

    v9 = 0;

    Sleep(0xBB8u);

    GetTempPathW(0xC8u, &Buffer);

    wsprintfW(&Buffer, L"%s%d.jpg", &Buffer, i);

    v2 = CREATE_BITMAP(&v9);

    Save_img(v2, &Buffer);

    DeleteDC(v1);

    GdiplusShutdown(v4);

    ++i;

  }

  while ( i < 5 );

  Sleep(0x2710u);

  return sub_10001C90(&unk_10004140);

}


CREATE_BITMAP(&v9){

  v1 = a1;

  if ( IsRectEmpty(a1) )

  {

    result = 0;

  }

  else

  {

    v8 = CreateDCA("DISPLAY", 0, 0, 0);

    hDCA = v8;

    v9 = CreateCompatibleDC(v8);

    v10 = v1->top;

    v5 = v1->right;

    v6 = v9;

    v11 = v1->left;

    v4 = v1->bottom;

    v19 = v11;

    v18 = v10;

    H_value = GetDeviceCaps(hDCA, 8);

    V_value = GetDeviceCaps(hDCA, 10);

    if ( v19 < 0 )

      v19 = 0;

    if ( v18 < 0 )

      v18 = 0;

    if ( v5 > H_value )

      v5 = H_value;

    if ( v4 > V_value )

      v4 = V_value;

    v12 = v4 - v18;

    v13 = v5 - v19;

    v14 = CreateCompatibleBitmap(hDCA, v13, v12);

    v15 = SelectObject(v6, v14);

    BitBlt(v6, 0, 0, v13, v12, hDCA, v19, v18, 0xCC0020u);

    v16 = SelectObject(v6, v15);

    (DeleteDC)(v17, hDCA);

    DeleteDC(v6);

    result = v16;

  }

  return result;

}


Save_img(v2, &Buffer){

  v4 = 0;

  GdipCreateBitmapFromHBITMAP(this, 0, &v4);

  v3 = v4;

  jpeg_encode(&v6);

  v8 = dword_1000317C;

  v9 = dword_10003180;

  v7 = 1;

  v10 = dword_10003184;

  v12 = 1;

  v11 = dword_10003188;

  v14 = &v5;

  v13 = 4;

  v5 = 30;

  GdipSaveImageToFile(v3, a2, &v6, &v7);

  return GdipDisposeImage(v3);

}

  Comments,     Trackbacks

Ubuntu 12.04 – How to Install KVM Virtualization solution on Ubuntu 12.04

http://c-nergy.be/blog/?p=2965

이게 딱 잘 나와있음..


Ubuntu 12.04 – How to Install KVM Virtualization solution on Ubuntu 12.04

Hello World,

As you can see from my previous posts, I’ve been playing around with the Ubuntu 12.04 software. A topic that I wanted to write about since a really long time is the KVM virtualization solution. The KVM virtualization software is built-in in Linux Operating system. I was looking for possible virtualization software that could be used with Ubuntu 12.04 and the first that came into my mind was KVM. However, note that solutions such as virtualbox or vmware (server or player) can be also installed on your Ubuntu machine and have virtualization capabilities. We will investigate these other options in some coming posts.

At the moment, let focus on the KVM Solution…. So, Let’s Go

Introduction

By default, Linux Operating system provides within the kernel virtualization capabilities i.e. Kernel Virtual Machine (kvm). Before enabling the kvm feature, you will first need to ensure that you meet the hardware and software requirements.

Verifying that CPU support virtualization

Before installing any virtualization software, you might want to ensure that you have a cpu with hardware assisted virtualization. Intel-VT cpu and AMD-V are cpu type that support hardware virtualization. In this quite old post, we were already describing the way to check for virtualization support.

To check that your computer support virtualization, you can issuse one of the following commands :

  • egrep -c ’(vmx |svm’) /proc/cpuinfo

If this command returns the value 0, the cpu does not support hardware virtualization. If the command returns value 1 or greater, your cpu is capable of running virtualization software. The following screenshot shows the output of the command on my system and yes, virtualization is supported. :-)

kvm_ubuntu_1

click on picture for better resolution

Another way to check would be to use the command kvm-ok.

kvm_ubuntu_3

click on picture for better resolution

I issue this command on my system as well and discovered that I was missing some packages (cpu checker). I had to install this package first in order to be able to run the kvm-ok command (see the screenshot below).

kvm_ubuntu_2

click on picture for better resolution


Note :

  • If you receive a message similar to “INFO: your cpu does not support KVM extensions, KVM acceleration can not be used”, you might still be able to run virtual machines but the performance will not be really good since you will not be using KVM extensions.
  • If you receive a message similar to KVM Acceleration cannot be used might means that hardwared-assisted virtualization capabilities is present on the system but not activitated in the BIOS


Checking the CPU architecture (32-bit or 64-bit)

We would recommend to run a 64-bit version of Ubuntu 12.04 simply because you will be able to host 32-bit and 64-bit virtual machines. Knowing that the new Microsoft Operating system only support 64-bit, this would make sense. To check this, you can simply try to install ubuntu 64-bit on your system, if the 64-bit architecture is not supported, you will get an error message and the installation process will be stopped.

Another way (if you have already installed Ubuntu) would be to issue the following command

  • egrep -c ’lm’ /proc/cpuinfo

If the output is O, you are not using a 64-bit CPU. If the Output is 1 or greater, you are running 64-bit CPU and can proceed with the KVM installation

kvm_ubuntu_4

click on picture for better resolution


Note: For your information, you can have kvm installed on a 32-bit system but will be then able to run only 32-bit guests

Verifying that Operating system version

Using the system monitor interface, you can easily check that the operating system you are running is 32-bit or 64-bit. Whatever the desktop interface you are running, type in the dash/activities, system and select system monitor. In the sytem tab, you can see the version of the operating system.
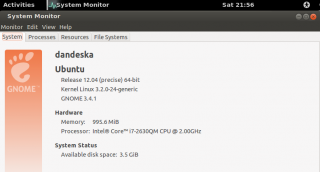
kvm_ubuntu_5

click on picture for better resolution

For the geek, you can also using the command line and digit the following command line (see screenshot)

kvm_ubuntu_6

click on picture for better resolution

If the output is something like x86_x64, you are running a 64-bit


Installating KVM packages

If you reach this section, we assume that you meet the basic requirements in order to have KVM software running. It’s time to download and install the kvm packages. With Ubuntu, this is quite easy. You can use the Ubuntu software GUI based interface or you can use the command line

If you prefer to use the GUI,

  • Launch the Ubuntu Software Center, and in the search box type qemu-kvm. Click on the package.The package is highlighted and you will see two buttons : more and Install. Click on more button.
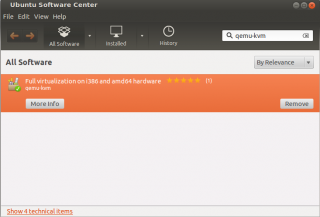
kvm_ubuntu_7

click on picture for better resolution

  • Scroll down and select the 2 additional Add-ons
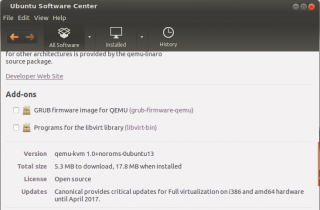
kvm_ubuntu_8

click on picture for better resolution

  • You are ready to install the package. Press the Install button (scroll up to see it)
  • Check that the Bridge-utils package has been installed as well. From the ubuntu Software Center, type in the search box bridge-utils and you should see it already installed. If not, install it
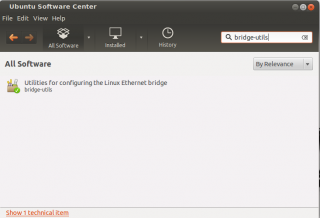
kvm_ubuntu_9

click on picture for better resolution


If you prefer to use the command line ( slightly faster), simply type the following command and wait for the installation to complete.

  • sudo apt-get install qemu-kvm libvirt-bin bridge-utils

Installating Management Interface

There are different management tools available with KVM virtualization solution. For this post, we will simply install the ‘de facto’ standard virtual Machine Manager (VMM). To perform the installation, you can use the Ubuntu software Center. In the search box, type virt and you should see in the list the VMM package. click on it and press the install button

kvm_ubuntu_19

click on picture for Better Resolution


You can perform the same installation operation using the command line by issuing the following command

  • sudo apt-get install virt-manager


After the installation complete, you can try to connect to the management interface (by typing in the Dash/activities search box virtual. the application icons will be displayed. Click on it.
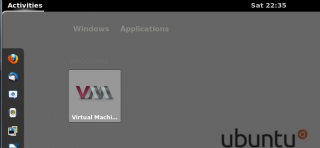
kvm_ubuntu_10_a

Click on picture for better Resolution

The application will start but you will get immediately an error message. (see screenshot)
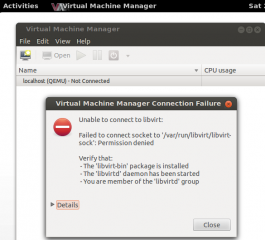
kvm_ubuntu_10

Click on picture for Better resolution


Actually, you need to create a new user on your system and to add this user to a specific group (called libvirtd). This will basically grant the right to use the Virt-manager interface. With Ubuntu 12.04, it simply easier to perform the group creation from the command line. By default, Ubuntu 12.04 does not come with a utility to manage groups.

To add your user account (for example griffon) into the group libvirtd, you would type

  • sudo adduser griffon libvirtd

Note : If you want, you can also install the gnome users and group interface back into Ubuntu by installing the package gnome-system-tools. When installed, you should have a Users and Groups interface that can be used from the GUI.


You will need to logoff and login again in order to have the changes applied. Try to launch the virt-manager application again, and you should be able to have it started. You are now ready to create your first virtual machine using KVM as Hypervisor.

Creating your First virtual machine

It’s time to create you first virtual machine on Ubuntu when using KVM as your preferred Hypervisor. At this stage, you have launched the Virtual Machine Manager and you should see a dialog box similar to this one
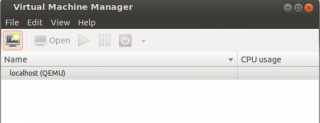
kvm_ubuntu_11

Click on picture for Better resolution

click on the highlighted computer icon and the New virtual machine wizard starts.
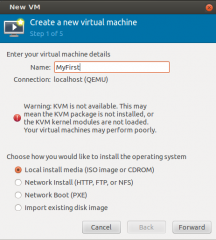
kvm_ubuntu_12

Click on picture for Better resolution

Provide the information and Press Forward.

In the following screen, select the installation source and the type of virtual machine that you want to install. Press Forward
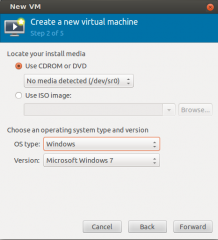
kvm_ubuntu_13

Click on picture for Better resolution

In the next screen, simply specify CPU and Memory information. Press Forward
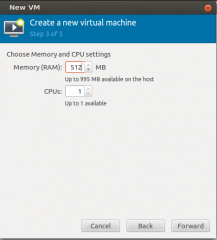
kvm_ubuntu_14

Click on picture for Better resolution

In the next screen, provide the information about the virtual disk to created and Press Forward
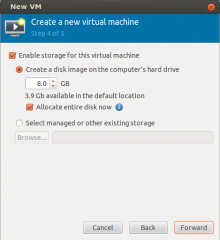
kvm_ubuntu_15

Click on picture for Better resolution

In the final screen, provide the information about the Virtual networking and Press Finish
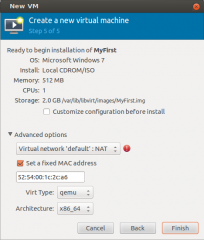
kvm_ubuntu_16

Click on picture for Better resolution

At this stage, you will need to perform the installation of your operating system and you should be ready to go for the rest of your journey

Final Notes

And Voila. We have just installed a virtualization solution on our ubuntu computer. For me, this was the first time I was playing with KVM. Nowadays, It’s really easy to enable virtualization solution within Linux Operating system. You install a bunch of additional packages and you are ready to go. A positive point also is that the process is actually well documented. I’ve found plenty of information on internet when I was stucked with my setup.

Something we didn’t speak about is the kvm management options. You can manage your virtual machines using command line (great for automation), via the Virt-Manager or you can install other kvm mangement tools like oVirt2 to perform your day to day activities. If I have some spare time, we might want to investigate these solutions.

The only drawback (I can see ) might be the fact that KVM does not support 3D acceleration. If you have need that, you might want to go for another virtualization option (virtualbox or vmware) on top of your ubuntu operating system

Till next time

See ya


References : https://help.ubuntu.com/community/KVM/

'툴 정보 및 사용법 > ETC' 카테고리의 다른 글

Ubuntu 삭제 파일 복구(testdisk)  (0) 2014.04.01
유용한 리눅스 명령어 모음.. 좋네요.  (0) 2014.03.27
VirtualKD COM 에러  (0) 2013.07.05
vim 기본 설정하기  (0) 2013.04.22
vSphere 프로비저닝 개념  (0) 2013.01.31
  Comments,     Trackbacks

virtualbox-host-only-network-cuckoo-sandbox-0-4-2/

http://precisionsec.com/virtualbox-host-only-network-cuckoo-sandbox-0-4-2/


virtualbox 설치 후 (cuckoo)agent.py와 xmlrpc로 연결되려면 host-only interface를 연결해야함

host-only 연결이지만 방화벽 설정 해주면 nat같이 사용가능. 아래 참조.


The purpose of this post is to guide you through setting up host-only networking using VirtualBox for Cuckoo Sandbox. Using this method you can have multiple analysis machines running on the same server concurrently while giving all of them access to the Internet. This method is preferred over bridged networking because you only need one external IP. This post assumes that you have Virtualbox and your guest VMs installed and Cuckoo extracted somewhere.

First create a host-only interface on host:

vboxmanage hostonlyif create
vboxmanage hostonlyif ipconfig vboxnet0 --ip 192.168.56.1

Now you should see vboxnet0 configured with that IP when running ifconfig:

vboxnet0  Link encap:Ethernet  HWaddr 0A:00:27:00:00:00  
          inet addr:192.168.56.1  Bcast:192.168.56.255  Mask:255.255.255.0
          inet6 addr: fe80::800:27ff:fe00:0/64 Scope:Link
          UP BROADCAST RUNNING MULTICAST  MTU:1500  Metric:1
          RX packets:0 errors:0 dropped:0 overruns:0 frame:0
          TX packets:273 errors:0 dropped:0 overruns:0 carrier:0
          collisions:0 txqueuelen:1000 
          RX bytes:0 (0.0 b)  TX bytes:31818 (31.0 KiB)

Next you need to set the NIC on the guest Virtual Machine as a host only interface. This can be done with the following commands:

vboxmanage modifyvm CuckooBox --hostonlyadapter1 vboxnet0
vboxmanage modifyvm CuckooBox --nic1 hostonly

Now you will have to set up networking on the guest to use the host as a gateway. I use the following settings:

Static IP - 192.168.56.101
DNS - any DNS server (8.8.8.8)
Default Gateway - 192.168.56.1

In order to have your Virtual Machines be able to access the internet you will have to add the followingiptables rules. This will forward packets through the host and on to the Internet:

iptables -A FORWARD -o eth0 -i vboxnet0 -s 192.168.56.0/24 -m conntrack --ctstate NEW -j ACCEPT
iptables -A FORWARD -m conntrack --ctstate ESTABLISHED,RELATED -j ACCEPT
iptables -A POSTROUTING -t nat -j MASQUERADE

You will also need to enable IP forwarding on the host by issuing the following command (as root):

echo 1 > /proc/sys/net/ipv4/ip_forward

If everything worked properly you should now have Internet connectivity from the guest to the Internet and you should be able to ping back and forth between the guest and the host.

Now you need to install the agent on the guest and edit the conf/virtualbox.conf file with the correct parameters as outlined in the Cuckoo documentation, set up your snapshot and you are in business.

'유용한 지식 자료들 > 기타' 카테고리의 다른 글

MFC 리버싱하기  (0) 2013.08.12
Decompilers  (0) 2013.08.12
리눅스 du 명령(디렉토리 용량 확인) 응용  (0) 2013.07.16
포렌직 자료  (0) 2013.07.16
Kernel32 Wow64관련 API에 대하여.  (0) 2013.07.09
  Comments,     Trackbacks

python version 2.6.5 -> 2.7.2 (using pythonbrew)

ubuntu 10.04


python version 2.6.5 -> 2.7.2

(python 2.7.2는 설치하지 않은 상태)


http://gauryan.blogspot.kr/2011/07/ubuntu-1004-lts-nginx-django-13-fastcgi.html


# aptitude install zlibc zlib1g-dev

# echo 'export PYTHONBREW_ROOT=/opt/pythonbrew' >> /etc/profile; source /etc/profile

# curl -kLO http://xrl.us/pythonbrewinstall; chmod +x pythonbrewinstall; ./pythonbrewinstall

# echo 'source /opt/pythonbrew/etc/bashrc' >> /etc/profile; source /etc/profile

# pythonbrew install --force 2.7.2 (원본으로 안되서 이렇게 하니 되네요.)

# pythonbrew switch 2.7.2


그외 삽질하게 했던 자료들 링크

http://stackoverflow.com/questions/5233536/python-2-7-on-ubuntu

https://github.com/utahta/pythonbrew


--------------------------------///

그외 방법들로 2.7.2로 바꾸는 방법(2.7.2로 설치 후 defult version을 교체)


우분투 파이썬 defult version 바꾸기

http://intellectseed.wordpress.com/2012/10/26/how-to-change-default-python-version-in-ubuntu/


yara python 설치

http://santi-bassett.blogspot.kr/2013/01/installing-cuckoo-sandbox-on-virtualbox.html

!!!yara python 설치하려면 개발 모듈이 설치 되야함 

apt-get install python2.7-dev


python2.7 설치(아래링크는 2.6으로 낮추는 방법)

http://intellectseed.wordpress.com/2012/10/26/how-to-change-default-python-version-in-ubuntu/

2.7 설치 후 링크만 설정해주면 됨

2.7은 소스 받아서 설치함

  Comments,     Trackbacks

625 mbr악성코드 간이 분석.. (625 mbr malware simple analysis)


★625악성코드의 특징

# DNS 증폭 DDOS(DNS Amplification DDoS, aka SMURF attack)

- 이거 다시 확인


mbr악성코드 특징(0708a979a5c7c3a0450b7ddc37faead7)


네트워크 관련

VICTIM 정보를 XOR 해서 유출(상태 파악)


프로세스 관련

User 계정에 따라 파라미터 -n -b -r -i -p -m -z -d -f -w -t -a 등을 붙혀 실행


defualt

Wow64DisableWow64FsRedirection - 64bit 확인(wow64 리다이렉션 기능을 멈추지만 그 용도로 쓰지는 않는 듯)

WTSEnumerateSessionsW - 계정 정보 검색, 아래 API로 토큰 정보를 수정하여 실행

WTSQueryUserToken

DuplicateTokenEx

SetTokenInformation


-b 옵션

mbr 변조


서비스 관련

Sens, Alerter - 중지


계정 관련

net user [계정] "highanon2013"

del "[계정]\Temp\3F03.tmp.bat"


파일 시스템 관련(PE 파일, 영상 파일, 이미지 파일, 웹 파일, 기타를 확장자로 구분하여 삭제)

GetDriveTypeW

_wmakepath "\\?\E:\*.*"

PathMatchSpecW 확장자 비교 함수 사용

[_remove:00401d40]영상, 이미지 확장자 확인 후 파일 변조, 그 후 다음 루틴

*.nms 파일외 *.exe, *.dll, *.sys, *.ocx은 삭제 또는 SetFileAttributesW 보안 해제 후 삭제

그외 확장자는 처음과 끝을 "20"으로 바꾼뒤 MoveFileW로 랜덤한 파일명으로 변환 & 삭제


# 320때 mbr삭제 악성코드와 연관성은 잘 모르겠다. mbr 악성코드만 보면 비슷하진 않음.

완전히 새로 코드를 짠 느낌.


# 윈도우7 관리자 권한으로 실행시 mbr 변조, 일반권한이면 유저권한의 파일만 삭제

- 윈도우7 기준으로 권한이 있어야 하는데, 그 역할은 아마도 웹하드 업데이터가 해줄 듯


'악성코드 상세분석' 카테고리의 다른 글

Bootkit 심층분석  (0) 2012.09.12
ahnurl.sys 루트킷 드라이버 분석  (0) 2012.04.06
온라인 게임 드롭퍼  (0) 2011.11.15
spoo1sv.exe 분석내용(이미지 포함)  (1) 2011.11.09
spoo1sv.exe  (1) 2011.11.07
  Comments,     Trackbacks